
SproutVideo websites support Single Sign-On (SSO) using the SAML 2.0 protocol, and can be setup with Active Directory, as well as other SSO Identity Providers that are compatible.
With SSO enabled, your viewers will have to be authenticated by your Identity Provider before they will be able to login and access your video content. When a viewer navigates to your video website URL, they are redirected to your Identity Provider for authentication, then, once verified, they are redirected automatically to your video site.
SSO only applies to videos on your video website. Embedded videos not on your video website are not protected by SSO.
NOTE: SSO is only available on the Forest plan.
Getting Started
You must have an existing Identity Provider, like Active Directory, in order to enable SSO for your video website.
This guide is for Active Directory only. If you need help with another Identity Provider, please contact support.
Add a Relying Party Trust
In Your ADFS Server, add a Relying Party Trust by navigating to Relying Party Trusts under Trust Relationships, clicking on ‘Add Relying Party Trust,’ and clicking Start to launch the Relying Party Trust Wizard.
Enter Data Manually
Select the option to ‘Enter data about the relying party manually’ and click Next:
Pick a Display Name
Enter the Display Name you’d like to use for your SproutVideo website. This can be your SproutVideo website URL, or another name that you can easily remember. Click Next to proceed.
Select ADFS Profile
Select the option to use the ‘ADFS Profile’ and click Next.
Do Not Select a Token Encryption Option
You do not need a token encryption certificate, so do not select any of the options, and click Next.
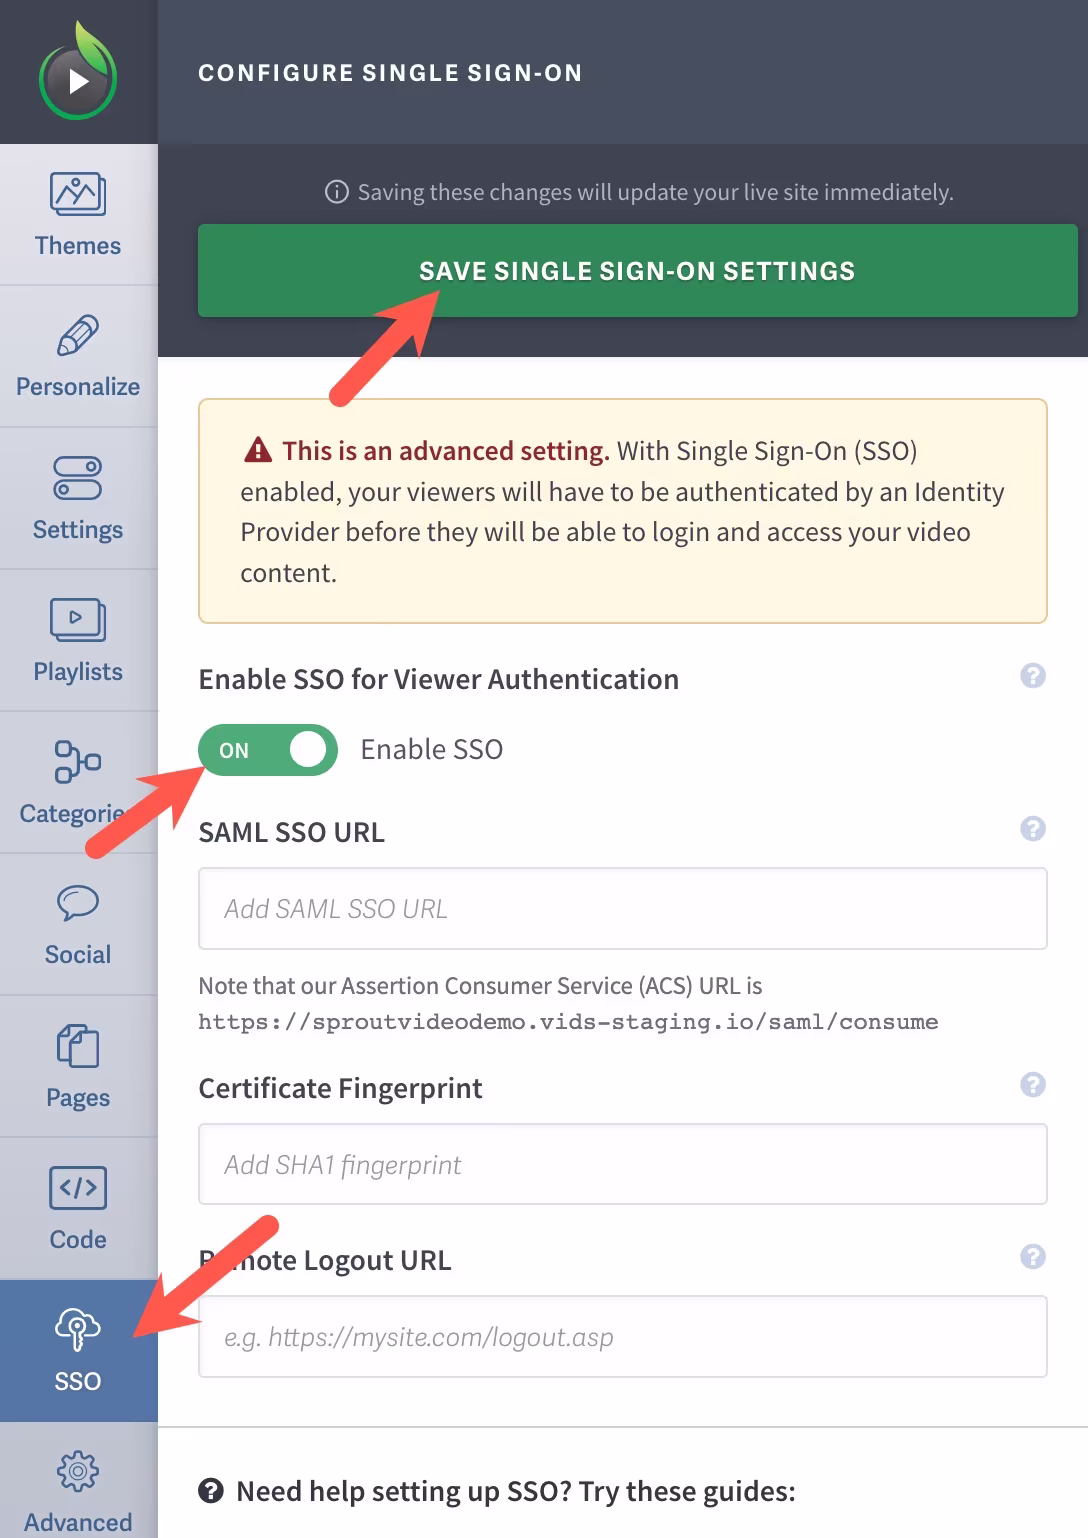
Locate Your SSO Settings in Your SproutVideo Account
To enable SSO, you’ll need some information located in your SproutVideo account, and to adjust some settings. Select the ‘Site Editor’ button at the top of the page, and select the ‘SSO’ tab. You can enable SSO for your site by toggling the ‘Enable SSO’ switch, and you’ll need to complete each field with the corresponding information from your Identity Provider (see below). Click ‘Save Single Sign On Settings’ at the top of the page when you are done. Note your Assertion Consumer Service (ACS) URL is based on your SproutVideo website URL.
Enable SAML 2.0 WebSSO Protocol
Check the box to enable the SAML 2.0 WebSSO Protocol. Then, enter your ACS URL in the following format, replacing “example” with your custom video website details: https://example.vids.io/saml/consume
Add Your SproutVideo Subdomain as the Relying Party Trust Identifier
Enter your SproutVideo subdomain or CNAME if enabled, usually something like “example.vids.io” but without the quotation marks, in the Relying Party Trust Identifier field, being sure to omit the “https://” part of the URL, and click Next.
Permit All Users to Access This Relying Party
Select the option to permit all users to access this relying party, and click Next.
Review Settings and Exit
Review your settings and click Next, then close the wizard.
Change the Secure Hash Algorithm to SHA-1
Right click on the new Relying Party Trust and select Properties. Then, select the Advanced tab. There, change the Secure Hash Algorithm to “SHA-1”, then click OK.
Edit Your Claim Rules
Right click on the new Relying Party Trust, select Edit Claim Rules, and click on ‘Add Rule.’
Edit Your Claim Rule Attributes
Right click on your relying party trust, then click ‘Edit Claim Rules’ and click ‘Add Rule.’ Select ‘Send LDAP Attributes as Claims,’ then click ‘Next.’ Select ‘Send LDAP as the Claim Type’ and enter ‘Get Attributes’ as the Claim rule name. Select ‘Active Directory’ as your Attribute store, ‘E-Mail-Addresses’ as the LDAP Attribute and ‘E-Mail Address’ as the Outgoing Claim Type. Select ‘Display-Name’ as the LDAP Attribute and “Name” as the Outgoing Claim Type. Click on Finish.
Edit Another Claim Rule
Right click on the new ‘Relying Party Trust,’ select ‘Edit Claim Rules,’ and click on ‘Add Rule.’ Select ‘Transform an Incoming Claim,’ then click ‘Next.’ On the next screen, enter ‘Name ID Transform’ as the Claim Rule Name, select ‘E-Mail Address’ as the Incoming claim type and select ‘Name ID’ as the Outgoing claim type, then select ‘Email’ as the Outgoing name ID format. Click ‘Finish,’ then click ‘OK.’
Enter Your SAML SSO URL in Your SproutVideo SSO Settings
Under ‘Site Editor’ > ‘Advanced’ > ‘SSO,’ you’ll find the field where you need to enter your SAML SSO URL. Typically, it’s formatted as the URL to your ADFS service with /adfs/ls/ appended to it, but yours might be different, so be sure to double check.
Enter Your Certificate Fingerprint in SproutVideo SSO Settings
From the ADFS console, navigate to ‘Service,’ then ‘Certificates,’ and right click on your ‘Token-Signing Certificate.’ Click on ‘View Certificate’ and go to the ‘Details’ tab, select the certificate thumbprint, and copy it. Paste the thumbprint into the ‘Certificate Fingerprint’ field in your SproutVideo account in your SSO settings under the Video Site tab.

Other articles in the Video Websites section:
- Overview of Advanced Video Website Settings
- Overview of Video Websites and Landing Pages
- Create Your Video Website in Two Steps
- Overview of Video Website Settings
- Overview of Video Website Privacy Settings
- How to Remove the SproutVideo Referral Logo
- How to Select or Change Themes for Your Video Website
