In the first episode of our Adobe After Effects tutorial series, we covered all the basic fundamentals of motion graphics, multi-layered compositions, and visual effects. In this episode, we dive a little deeper into After Effects, exploring the power of motion tracking.
By the end of this post, you’ll have a good understanding of how to track objects in space, steady shaky footage, and replace screens on a device.
In the video below, Nick LaClair, Creative Director at SproutVideo, will take you through various applications of motion tracking in Adobe After Effects.
For our second episode in this series, we recommend downloading our example project included in this tutorial so you can follow along. We’ve incorporated all the items you’ll need to get a better understanding of the various applications of tracking. By following along, you’ll be well on your way to implementing tracking in your own projects. Just click the link below to get the project.
Download File: After Effects Motion Tracking ProjectWhat is Motion Tracking in Adobe After Effects?
Motion tracking is the process of using technology to track the movement of an object in your video. Once you have data from the tracked object, you can apply the motion data to other objects or elements and it will match that movement.
The benefits of tracking truly shine through once you start to understand how they can be applied in your projects. We’ll be going over three popular applications: Tracking objects in space using null objects, stabilizing footage, and replacing screens.
Tracking Objects in Space
We’ll be looking at single-point tracking first. This is, as the name suggests, uses After Effects to capture data from a single point to use for tracking purposes. You can then take that data and apply it to another layer or object in your composition.
If you’re working with our example, you can choose a composition from the project panel. We will be using the ‘1.1 – Cafe’ to start. We are going to be using Name graphics to demonstrate how you can use motion tracking to have objects track with your videos at a certain point. This can be useful whenever you need a graphic or object to stick to a specific point in your video.
The layers in this composition have already been formatted to include an animation to pop into the frame. Check out episode one of our After Effect series if you want to know how to create these animations from scratch or need a refresher. In our example, we’ll be creating a null object to track the footage.
What is a Null Object
A null object is an invisible layer that can hold any information you want. This makes it perfect for tracking purposes. You can attach motion data from your footage to it without having to manipulate other layers that contain the visuals of your project. You can later attach multiple layers to a null object and they will inherit its motion data without having to change their own motion parameters. This process is called parenting which we’ll cover later in the post.
Creating a Null Object
First, we’ll create a null object by clicking on Layer in the menu bar, then New, Null Object. This will create a new layer in the layer panel. We suggest renaming it to help you stay organized. In the example, we are starting with the Daenerys layer, so we’ll rename it ‘Daenerys Null.’
Auto Tracking Motion
To track motion in your footage, you’ll need to double click the footage layer; ours is labeled “Cafe laptops.” This will open a new tab in the composition window at the top. Next is where the magic happens. On the right-hand side of the screen, you’ll see all the different editing tools you can choose from. Click on the tab that says, Tracker. If for some reason you don’t see this tab, you can access it by clicking View from the top menu, then Tracker.
From here, follow the steps below to track a specific point.
- Click the Track Motion button in the Tracker tab.
- For this example make sure only the Position checkbox is selected, not rotation or scale.
- Click Edit Target, and select the Null Object we created in the earlier steps. This tells After Effects we want the motion were tracking applied to the null object.
- Adjust your play head to where you want the tracking to begin.
- Zoom in if needed and move Tracking Point 1 to a desirable tracking location.
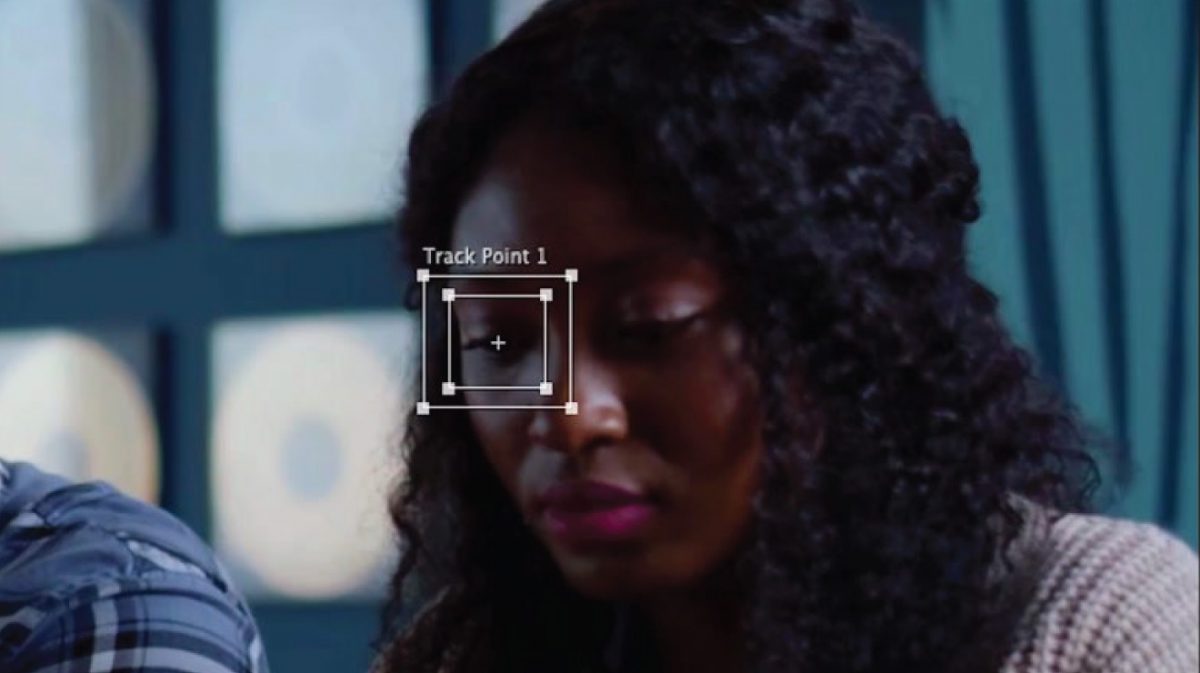
Tracking Points
Tracking points are used as a way for After Effects to attach data to a specific object in the footage. The more contrast there is, the better it will be able to track it. The smaller box should be right around the object you want to track, while the larger box should be large enough so After Effects knows where to scan for the object you have in the smaller box.
The smaller you can make these boxes, the better, since it takes a lot of time to render motion tracking. However, if there is a lot of movement in the scene, you may need larger boxes so that when the frames are being tracked, After Effects can continually find the target.
In our example, we place the tracker for Daenerys on her eye. This works well because of the contrast between her dark eyelashes and her skin. Make sure to pick a point that moves in a consistent way. Once you’ve picked a point, hit the Analyze Forward button ( ▶) in the tracker tab to begin analyzing the scene for motion.
Alternatively, if you want to track backward in time, simply hit the Analyze Backwards button (◀), and your clip will play in reverse and add tracking points.
One issue that may arise while tracking is if the object you’re tracking goes off-screen, but you want whatever you’re going to attach to the tracking to stay on that same path.
Adjusting Trackers
You can fix this by stopping the analysis on the last frame before it goes off-screen and switching it to a new point on the screen. To do this, hold Option on Mac or Alt on PC, and select and drag the outer box to a new track point. We chose a white square on the man’s shirt, which has plenty of contrast. After, hit the Analyze Forward button again until it reaches the end of the scene. This will take the tracking data from the new track point and extend the path of the original track point as if it were still on the screen.
If you’re satisfied with your tracking, hit Apply in the tracker tab, select X and Y in the pop-up window, and hit OK. After Effects will switch you back to the full composition in the composition window, where you can expand your null object in the layers tab to reveal all the position keyframes that have been created from the tracking data.
Manual Motion Tracking
In some unfortunate cases, After Effects won’t be able to track the object you need it to as cleanly as you would like. After pressing the Analyze Forward button in the Tracking tab, you may notice some crazy fluctuations or movements while it’s processing.
If this happens, you may need to resort to manually tracking your object. You can move forward or backward frame by frame by selecting the Analyze One Frame Forward or Analyze One Frame Backward button. These are the buttons next to the Analyze Forward and Backward buttons.
For each frame, you’ll have to go to the composition window and move the tracking box to stay on your point of interest in each frame. This will be a tedious process but will result in a perfect tracked object.
Fine-Tuning Your Trackers
If you realize you need to adjust your tracking later on in your editing process, simply go back to your footage layer, select which track point you need to adjust, either in the Layers tab or Tracker tab, and make any adjustments needed. Once you hit apply in the Tracker tab, it will update your project.
Parenting The Layers
The last step is to attach this Null Object layer to the Name layer to which you want to apply the tracked motion. Here are a few definitions that will be helpful in explaining how this works.
- Parenting is the process of linking multiple layers so that the movement of one layer follows the movement of another layer.
- A parent layer is a layer in which those linked to it will follow its motion.
- A child layer is a layer(s) that will follow the motion of a parent layer.
To apply this, go to the layer you want to be the ‘Child’, for our example that is the Daenerys layer, and under the Parent & Link section of the layers tab, select the Null object to make it the parent.
Another way to create a parent-child relationship between layers is to click and drag the “swirl” icon, called a “pick whip,” from the child layer to the parent layer. Tracking motion with this method is helpful because it keeps the Name Layer’s attributes free for you to transform the way you want while still attached to the Null Object’s movement.
Repeat all these steps for the various layers in the example project to achieve the look we did in the tutorial video. Depending on the points you choose, you may need to do a combination of auto-tracking, manual tracking, and various adjustments to get it to look just right.
Steadying Shaky Footage
Another amazing way to use the tracking functionality in After Effects is to stabilize shaky footage. This comes in handy whenever you need your shot to look super smooth as opposed to shaky or handheld.
We’ll use the “2 – Stabilization Composition” in the Example Project to walk through this example.
- Just like before, we’ll double-click on the layer we want to track. In this case, it’s called “Handheld.mov.”
- Choose Stabilize Motion from the Tracker tab.
- Make sure both the Position and Rotation boxes are checked, which will create two separate tracker points in the Composition window.
- Place each tracker on high contrast points in the scene similar to how you placed tracker points in the example above.
You’ll want these points to be as far away from each other as possible. This will provide better tracking data. One point represents the position, and the other the rotation. Once in place, click Analyze Track Forward and hit apply.
At this point, when you play your clip back, your scene will be stationary, and the edges of the frame will be moving to compensate for stabilized motion.
This will reveal black edges around your footage. To fix this, adjust the position and scale of that layer until those edges no longer appear in the frame. When you play it now, the footage will appear completely stable.
Replacing Screens
Our last example comes in handy whenever you need to replace the contents of a screen on a mobile device, computer, TV, or a similar application. Typically, recording something on a screen can prove difficult because of glare and other factors, so it’s relatively common to replace screens in post-production.
We’ll use the “3 – Screen Composition” in the Example Project to demonstrate how to pull this off. This composition consists of the “Monitor.mov” layer, where the monitor screen is located, and the “Footage.mp4” layer, which is what we’ll be replacing the screen with.
- Just like before, we’ll double-click on the layer you want to track. In this case, it’s called “Monitor.mov.”
- In the Tracker tab, select Track Motion, then change the Track Type to Perspective Corner Pin.
- Four track points will appear in the composition window. Place each of them on a corner of the screen you are replacing.
- Click Edit Target in the Tracker tab to make sure that the “Footage.Mp4” is the target.
- Analyze Forward, hit apply, and your screen replacement is complete.
After Effects can compensate for any shakes, rotation, or changes in the footage, so this technique will work for just about any clips where you need to replace a screen.
Learning to harness the power of motion tracking is an amazing tool to add to your video editing arsenal. Just like the basics, these techniques will require a lot of practice to master, but it’ll be worth it.
Be sure to subscribe to the SproutVideo Newsletter to get the next episode of our After Effects tutorial series in your inbox.