Harnessing the power of Adobe After Effects is a crucial tool for taking your videos to the next level. Learning how to create motion graphics, multi-layered compositions, and digital visual effects to add to your videos will help your videos stand out from the competition.
After Effects can be extremely complex, so this post will be the first in a series of tutorials. We’ll go over what After Effects is used for, creating compositions, important functions, and how to export a project. By the end of this post, you’ll have a basic understanding of After Effects and the ability to create simple animations.
In this episode of our How To Video: Post Production series, SproutVideo Creative Director, Nick LaClair, will walk you through the basics of Adobe After Effects.
Since this program is a bit more complicated than other creative programs, we included an Example Project you can download to follow along with. By following along with the example project, you’ll get a better understanding of how the various elements of After Effects work, and be one step closer to creating animations in After Effects on your own.
Download File: Adobe After Effects Example ProjectWhat is Adobe After Effects?
After Effects is one of the many tools provided by Adobe to help you creatively express your vision. With this particular program, you can create digital visual effects, motion graphics, animation, and compositions. It is used in the post-production process for a variety of mediums including videos, video games, and many different types of film production.
Most motion designers tend to use it for titles, lower thirds, or opening title sequences. In the video above we focus on creating a lower third and animating an object. We’ll use these as examples throughout the rest of the post.
Getting Started with After Effects
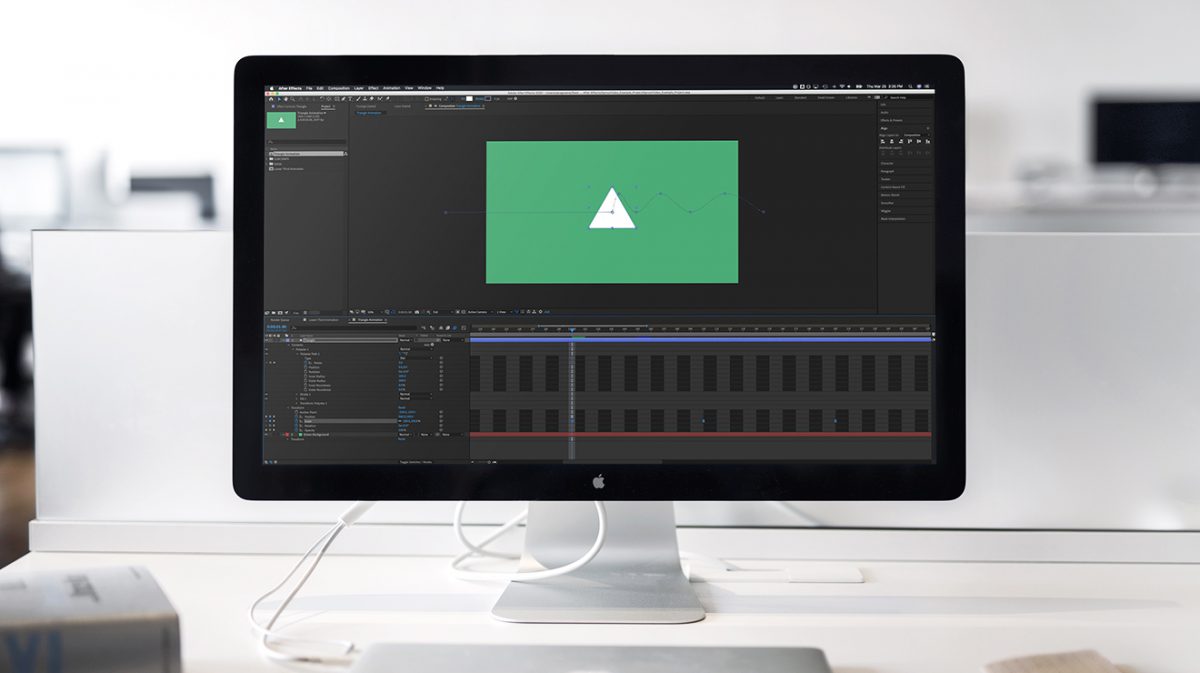
When you first open After Effects, you’ll be prompted to open a project or create a new one. If you’re following along with the Example Project, open it side-by-side with this blog post to follow along. Once your project is open, your workspace should look very similar to the image below.
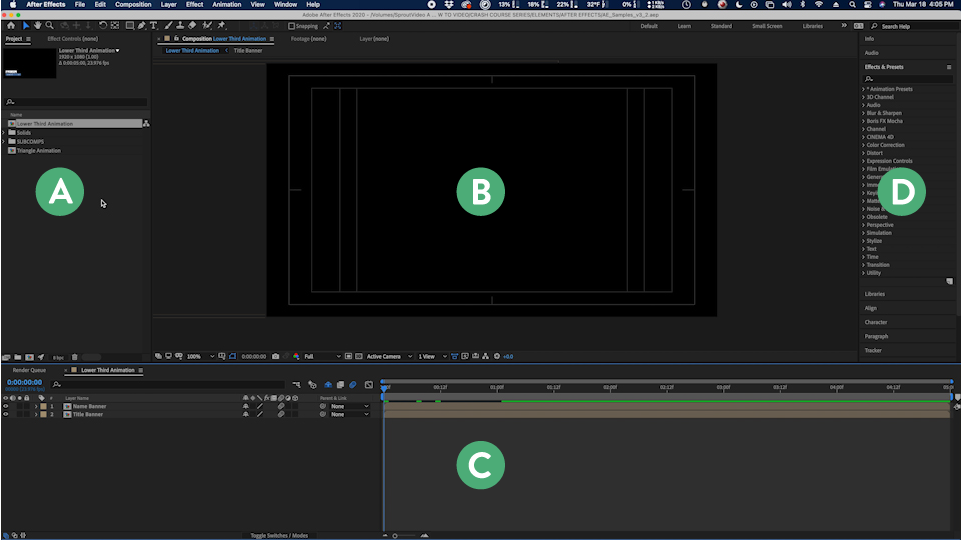
On the top left is the project panel (A), with all the footage, elements, folders, and compositions. The composition window is in the center (B). This is where you’ll view what you’re working on. Along the bottom are the layers and timeline viewer (C); we’ll spend a good amount of time here. And on the right is a long list of effects, presets, and more (D).
Composition Setup
Your composition in After Effects is similar to a sequence in Premiere Pro. This is where you’ll be creating the visuals for your project. When creating a new composition, click ‘New Composition’ in the main window, and you’ll be prompted to select a number of options as seen below.
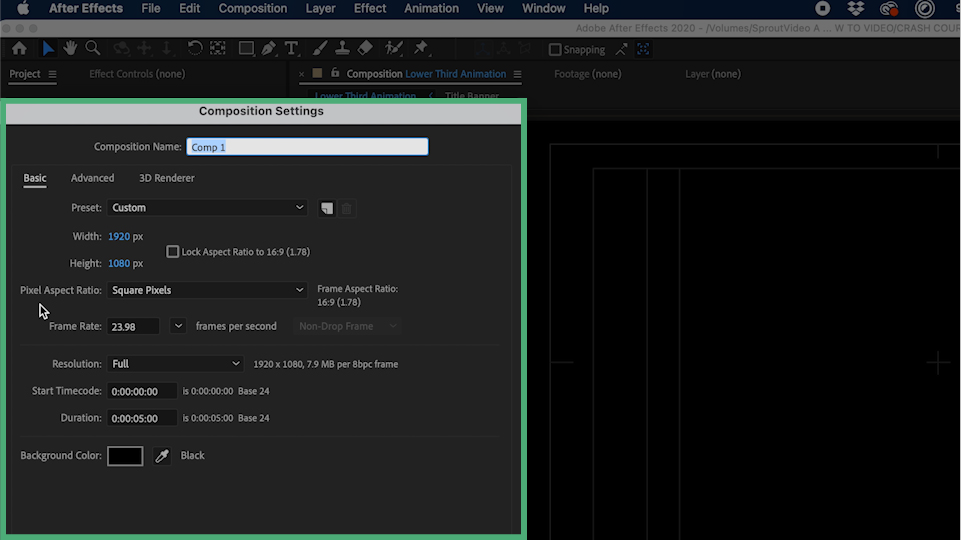
You’ll want to match the resolution, aspect ratio, and frame rate to the video that you’re building the graphics for. As for the duration, you’ll have to make an educated guess as to how long you think you need it to be. Overestimating is encouraged since you can always trim the project at the end before you export it.
Since our project is just an example and not being created for a particular video, we left the settings as the standard. Full HD resolution, 1920×1080 resolution, 23.98 frames per second, and five seconds for duration.
If you are working with our example, you can choose a composition from the project panel. We will be using the ‘Lower Thirds Animation’ first; double click that option to open it.
Exploring the Layers and Timeline
These areas are going to be where you’ll be doing the bulk of your work to manipulate your files to create an animation.
Navigating the Layers Panel
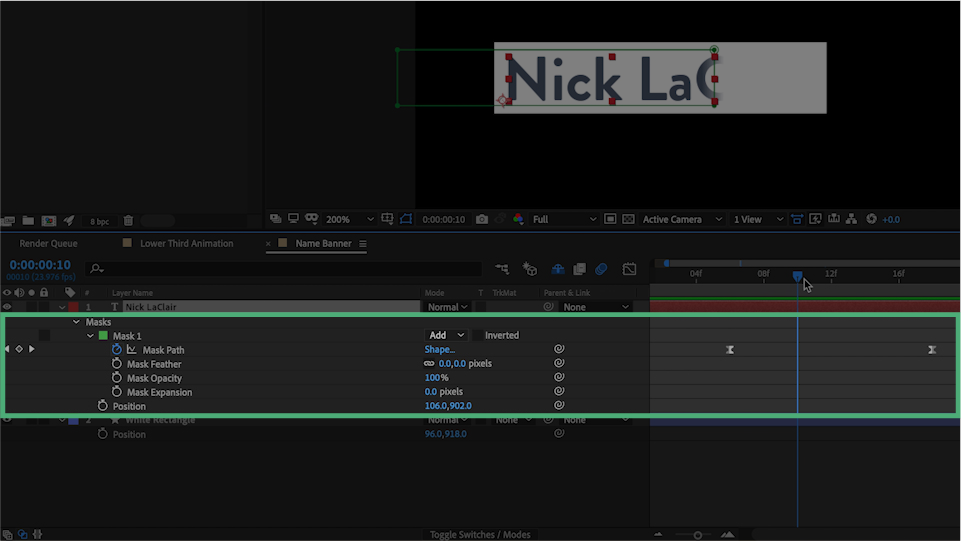
Once the example is open, you’ll see the various layers associated with the composition. In our example, we have two: “Name Banner” and “Title Banner.”
When you add various items to your project they show up as layers. This could be images, text, files, shapes, compositions, and so on. You can alter the order of files by dragging them up and down. Bringing a file towards the top pulls it to the front of the composition, and moving it towards the bottom pushes it to the back. Clicking the eyeball icon at the far left turns that layer on and off.
To take things further, you can edit the layers by clicking the arrow next to the layer’s number and color square. This will drop down more options, including the transform parameters, which we’ll cover in-depth below.
Playback in the Timeline
To the right of the layers, you’ll see the timeline. The timeline is directly related to each layer you add to your composition. The long bar represents the duration of each layer. You can also see the keyframes you create when you expand your open drop-down menus for each layer. Your playhead is located in the timeline area as well. Using the spacebar, you can start and stop your animation to see what you’ve created. Since After Effects is a graphics-intensive program, you may not be able to play your animation back smoothly.
The green bar just above your timeline will indicate if it has rendered enough to play smoothly. If the green bar isn’t lit up, there are two ways to go about seeing your animation. You could choose a lower quality playback to ease the load and allow After Effects to render the preview more quickly. Or, you can hit space to begin playback, and it will render each frame one at a time. This will populate the green bar so you can then go back and play it from the beginning.

In addition to playing your animation in the timeline, you can move layers left or right, and trim them simply by dragging from the middle or the edges of the bar in the timeline.
Keyframes & Parameters
Keyframes and parameters are some of the most important aspects of unlocking the power of Adobe After Effects.
- A keyframe marks the start points and endpoints for actions in your animation.
- A parameter is the value of the object, file, or layer you can adjust with keyframes.
To edit parameters and add keyframes, go to the layer you want, click the arrow, to reveal the transform function. Next, click the arrow next to transform to reveal the parameters you’ll need to do basic animations. Anchor point, position, scale, rotation, and opacity are all parameters that are controlled with keyframes.
Creating Keyframes
In our example, we already have keyframes created with the Position parameter set to create an animation that slides the ‘Name Banner’ and ‘Title Banner’ onto the screen as time goes on.
By creating two new keyframes in each layer further in the timeline, we can change the Position parameter to slide the text off-screen. You can apply the steps below to accomplish what we did in the example, along with any other parameter to which you want to add keyframes.
- Select the layer you want to animate.
- Choose the parameter you want to change.
- Move the playhead in the timeline to where you want to keyframe to appear.
- Click the stopwatch icon to the left of the parameter to create a keyframe on the timeline.
- To create another keyframe, scroll to the desired endpoint of the motion, adjust the parameter to the desired position and a second keyframe will be created.
Throughout the process of creating keyframes, you can see how changing parameters affect your text by seeing the motion in the composition window. Visually, this will help you know how far to move the value of your desired parameter up or down to get the desired effect. Beyond creating keyframes, there are a few more functions you can implement to create even better animations.
Motion Blur
Of the many advantages of animating objects in After Effects, adding motion blur is one of the simplest and most important. Motion blur is important because, without it, your animation may look a bit choppy. This effect adds just enough blur to make your movement look more natural to the eye.
At the top of the Layers panel, you’ll see three overlapping circles, which represent motion blur. Select the motional blur switch for whichever layer you want to enable it.
In the example project, play the animation with motion blur on then off. This will show you just how big of a difference this feature can make.
Interpolation & Graph Editor
Interpolation is how the program figures out the values between two points. In other words, this is how After Effects determines how the element you’re animating acts between two keyframes.
Each keyframe can be adjusted to make your animation function how you want. For our purposes, we’ll only be looking at the “Easy Ease” function to help smooth out the motion we’ve added to our layer. For a more in-depth look at interpolation, check out this Keyframe Type article from the School of Motion.
To apply Easy Ease to your keyframe, right-click the keyframe, select Keyframe Assistant, then Easy Ease. This changes the diamond shape of a new keyframe into an hourglass shape. With the click of a button, your animation will be much more smooth, starting out fast and then slowing down, easing itself toward the keyframe.
To see the visual representation of this, click on the graph icon at the top of the Layers panel to open the Graph Editor. For each parameter, you can see all the keyframes and the curve that represents the speed of the movement between keyframes.
To adjust the curve and change the motion, click on the keyframes, and a small handle will appear. Moving the handle allows you to change the flow of motion. In the example we created, it starts slow, then speeds up for a smooth organic motion.
Nesting Compositions
One of the most powerful aspects of After Effects is how you can use compositions inside of other compositions. Essentially, if you have an animation created and want to then edit that composition as a layer within your bigger composition, you can do that simply by going to the Project panel in the top left, and dragging any new compositions to your Layers panel.
For example, the two layers we’re working on within our Example Project are compositions themselves, which include our last function, masking.
Masking
A mask allows you to control the visibility of a particular layer, typically by creating a shape or specific cutout. This is powerful because it allows you to cut out layers, combine different elements together and create unique transitions.
In our Example Project, you may have noticed that the text has some animation happening while it is sliding in. This is an example of using a mask in a composition, within another composition. You can double click either layer in the Lower Third Animation composition to reveal the composition where the masking is taking place.
To create a mask, right-click the layer and choose mask, then new mask. A new drop-down layer under the main layer will appear. To use the mask to make the text animate in, set keyframes the same way as before, only this time you’ll be moving the mask and the text stays still.
Creating Text and Shapes
Another powerful tool is the ability to create text and shapes right in your project. Being able to create and manipulate them right in After Effects, can save you time going back and forth between other design programs.
At the top of the screen, you’ll see a T icon for text and a Rectangle icon for shapes. When you select T, you‘ll be able to begin writing your text in the composition window. Afterward, you can adjust the font, style, spacing, and more with the effects panel to the right.
For shapes, you’ll have to ensure you don’t have a layer selected, then click and hold the Rectangle icon to choose which shape you want to create. In the Composition viewer, you can use your mouse to draw the shape. It will then show up as a layer in the Layer panel, where you can adjust all the same transform parameters we’ve gone over throughout the post.
Advanced Keyframing
If you’re feeling adventurous, we included another composition in the Example Project that gets a bit more in-depth when it comes to keyframing. This is the Triangle Animation Composition.
In this composition, we created a multi-point shape and then applied several different transform parameters together to create the desired animation. All of the same fundamentals we went over apply for keyframing and adjusting graphics in the graph editor.
This is a further breakdown of how we achieved the animation above. We chose the polygon option when creating a new shape, then navigated to that new shape layer’s transform parameters to choose ‘three points’ to make it into a triangle, then created keyframes to make it into a 10 point star. We applied keyframes for opacity, position, and rotation overtime to get the desired effect.
You can learn a lot by creating items like this, studying this example, and experimenting on your own.
How to Export Your Project
If you’ve made it this far, we hope you’ve picked up the basics of changing up your motion graphics with After Effects. Feel free to continue experimenting, trying different effects, and adjusting keyframes until you have something you like.
Once you’re satisfied with your creation, exporting your project is the final step. You’ll need to add your composition to the render queue. Either go to File, Export, Add to Render Queue, or hit CTRL M on a PC or Command M on a mac. Once in the Render Queue, which should show up at the bottom of the screen in place of your timeline, there are three menus that need to be addressed before exporting.
Render Settings
First, you’ll want to click on ‘Best Settings.’ Here a window will pop up where you can double-check to see if all of your settings are where you want them to be for your export. These settings typically won’t change unless you’re exporting for a special reason.
Output module
This window is where you will choose what variation of the composition you would like to export. This includes format, codec, color depth, channels, and audio output settings. In almost all situations you’ll export using the QuickTime Format with the animation codec, this is best for animations like the one we used in our example project.
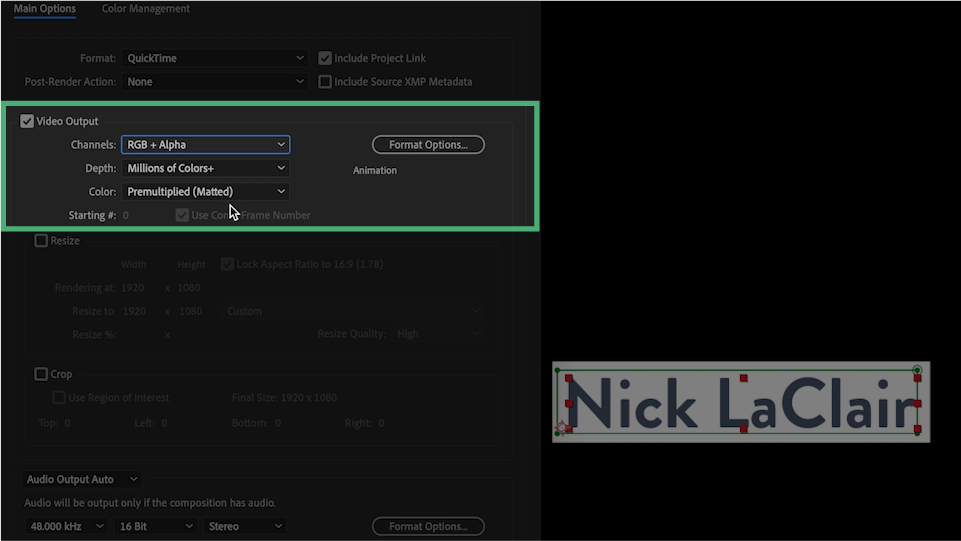
All the default settings for QuickTime work just fine unless you need to export your animation without a background. To change this you’ll need to change the channel from RGB to RGB+Alpha. Even in a composition like ours where we didn’t add a background, one will still show up unless you choose this option.
Output To
Last but not least, you will need to choose the destination for your exported file. You can also change the name of the file here if you need to make it something more unique than the name of the composition.
Once all the settings are in place, simply hit enter or the Render button off to the right and you’ll be done with your first Adobe After Effects piece.
Keyboard Shortcuts
We wanted to provide quick keys and shortcuts as a resource in this post as well. However, since After Effects is much more complicated than Premiere, we wanted to do things the “slow” way first.
Once you start getting familiar with the program, these shortcuts will certainly help speed up your workflow. You can download or print this PDF to reference for when you start editing on your own.
Download File: Adobe After Effects Quick Key Reference SheetThis How to Video episode and blog post are just the tip of the iceberg for Adobe After Effects. Starting with the basics is vital for establishing a strong foundation for what is possible with this program.
Be sure to subscribe to the SproutVideo Newsletter to get the next episode of our After Effects tutorial series in your inbox. Don’t forget to download the free reference sheet and example project included in this tutorial, too!