You already know you need a camera and a script to make a video for your business. But, did you know you also need a storyboard?
A storyboard is a powerful planning tool that can help you communicate your vision, and plan out the shots you’ll need in detail. They’re easy to make, and should be a regular part of your process.
In this detailed guide, we’ll walk you through how to create and use storyboards to improve how you produce videos for your business. We found some great examples from Game of Thrones and Pixar to boot.
What is a Storyboard?
A storyboard is essentially a sketch of how each part of a video will unfold, scene by scene. Typically, a storyboard is composed of a variety of squares filled with sketches or illustrations for each shot.
Each square is normally accompanied by notes or a short description of what is supposed to happen in each scene, along with a reference to the dialogue spoken during each scene. In some cases, storyboards can even take the place of a script, especially for interviews or ad-libbed footage.
From choosing impactful images and other graphics to writing the script that will accompany the video, careful planning is a key element when it comes to pulling off a successful video. That’s why so many businesses and individuals use a storyboard during pre-production.
Why Use a Storyboard?
There are many reasons why businesses opt to use storyboards, despite the fact that it adds another step to the production process. For example, sketching out a storyboard usually saves time and costs in the long run. When a project is better planned, it decreases the likelihood of needing to reshoot the video later.
Storyboarding is also an effective way to communicate your vision with team members and colleagues, which makes the project easier to produce overall. This is because storyboarding allows you to plan for the visuals and other production tools you will need.
Storyboarding: Small Steps Create the Big Picture
When making a storyboard, there a number of different steps to follow in order for it to result in a successful video. Let’s take a look at the storyboard process:
Create Blank Slides:
At the start of the storyboard process, create a series of blank slides, with plenty of room to work in. These can be free form, or neat squares – that’s up to how you prefer to work.
It’s hard to know how many slides you’ll need in advance. The rule of thumb is to create one for each shot, or scene in a video.
Don’t forget to leave space around each slide for notes. You can either create blank slides on paper, or use storyboard tools on a computer to create your slides. Another option is to use the storyboarding tool provided by popular design platform Canva.
Add Sketches/Illustrations:
Sketch each scene according to how you want it to appear in the final video. Remember, this stage is just a sketch; it doesn’t have to be overly detailed. Use arrows to indicate motion for characters.
The goal in this phase is simply to provide enough visual detail to convey a general impression of what is occurring in each scene. Each sketch should include the characters that are present, the action that’s unfolding, and what the overall framing will look like.
Add Notes and Cues:
Once you have finished your sketches, take the time to write out detailed notes and an abbreviated script for each slide. That way, the production team will know what’s supposed to happen or be said during each scene. Notes about scene transitions, camera angles, and other fine details should be added during this step, as well.
Will there be more than one character on the screen? What is the focus of the scene? Does the scene require a specific camera shot, movement, or angle? These are all important factors to consider when writing out your notes.
Some of the best examples we’ve seen are from Game of Thrones. In fact, there are a series of storyboards available for some of the iconic scenes of Game of Thrones. This one is particularly good.
We tried to pick one that would not qualify as a spoiler. If you aren’t caught up to Season 6, skip ahead to the next tip!
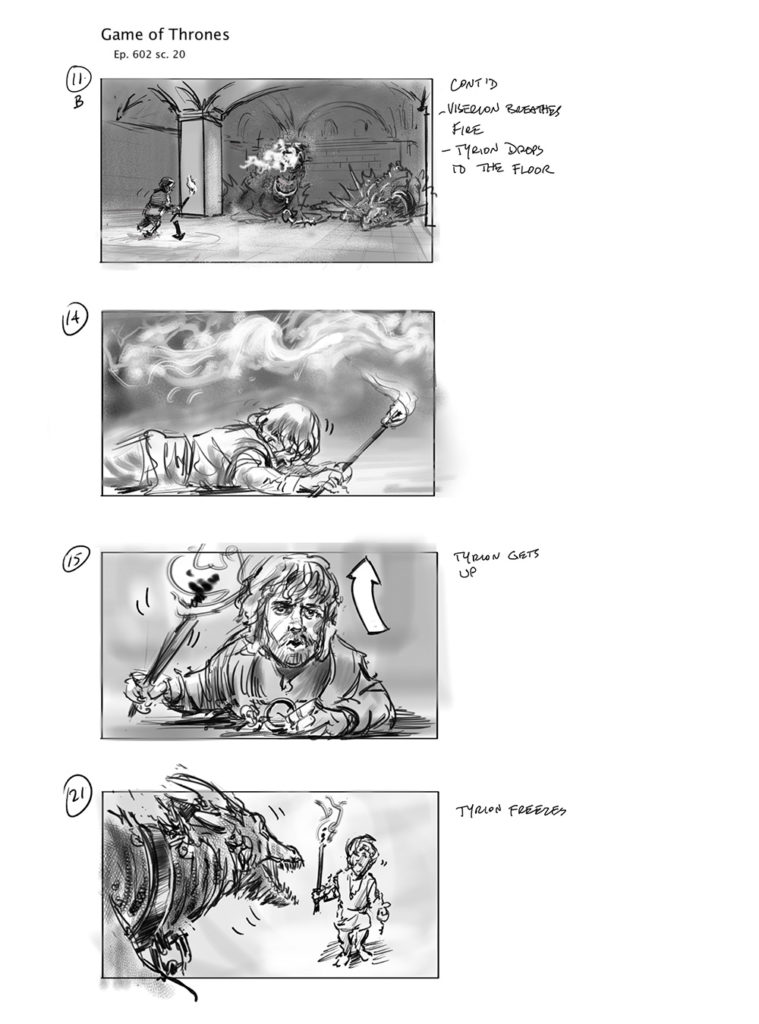
Image Credit: www.makingofgameofthrones.com
The images are detailed enough so you can tell where the camera is supposed to be, and what will be in the frame. Simple arrows indicate movement, and the notes summarize the action succinctly. If you’ve seen this episode, you’ll know the action that unfolded was almost exactly the same as what’s depicted here.
Share the Storyboard with Colleagues:
It’s really important to show your completed storyboard to team members or colleagues. Doing so will allow you to receive valuable feedback and questions that can greatly improve the overall video.
Ask whether the scenes make sense as they unfold, and whether the overall vision is clear. This is your chance to sell any stakeholders on your concept.
Plan Your Shoot
One huge advantage of storyboards is that they allow you to clearly visualize what needs to happen during filming. Any props or locations should be detailed, and this will simplify the rest of the process greatly.
For instance, you might choose to organize your shots by location, or camera angle. This will help keep the day of filming as efficient as possible since you won’t be constantly breaking equipment down and setting it back up.
Create Your Video:
With your storyboard complete, it’s time to create the video. By following your plans closely, you’ll be sure to wind up with the video you want.
Business Lessons From the Cinema
Some of the most fascinating behind-the-scenes insights from popular movies can come from the storyboards used to create them.
There are many examples out there, but this video from Pixar is one of our favorites. It is an older video, but it still does a great job of highlighting the importance of storyboarding for a film.
Besides, who doesn’t love Toy Story?
Animated videos are especially expensive to produce. Unlike live action, they can’t make use of cost-saving options like b-roll footage or multiple takes. Each scene has to be perfect the first time.
Although the stakes aren’t likely to be as high for your typical business video, the process of pitching an idea with a powerful visual aid like a storyboard will help get everyone on board with your concept. Further, it will help catch any corrections or improvements before you hit record. Hopefully, seeing how the animators at Pixar brought Toy Story to life with storyboarding will inspire you the next time you pitch a video idea to your team.
Final Thoughts
Planning out a storyboard for your next training video, product advertisement, or commercial can go a long way toward boosting the quality of the video and, therefore, your brand. Storyboarding is also an effective method of bringing your vision or message to life. Because of this, storyboards are quickly becoming a powerful tool for businesses of all sizes, and many marketing teams have begun integrating them in their video-making process.
What do you think? Have you implemented storyboards as part of your creative process? Share your thoughts in the comments below.