Separating the foreground from the background of a scene and creating virtual 3D cameras may sound impossible but that is exactly what we’ll be exploring in our final episode on Adobe After Effects. These advanced techniques are challenging to master but will set you apart from the competition.
By the end of this post, you’ll have a good understanding of Rotoscoping, separating an element from the background, and how you can use a 3D camera to animate objects.
In our first episode of our Adobe After Effects tutorial series, we established the basics. We looked at what After Effects is used for, created compositions, learned important functions, and how to export a project. In the second episode, we explored the power of motion tracking and the various ways you can use it in a project.
For our third episode in this series, we’re diving into advanced techniques of After Effects. We included another Example Project below you can download and a video you can watch to follow along.
Download File: Rotoscoping and 3D Camera After Effects Example ProjectNick LaClair, Creative Director at SproutVideo, will take you through this example project. He’ll show you how rotoscoping and using a 3D camera can enhance the overall look when adding graphics to footage. We’ve incorporated everything you need to get a good handle on the topics covered in this post.
We recommend working through the projects in Episode 1 and Episode 2 before this episode for the most well-rounded learning experience.
Example Project Objective
For this project, our goal is to enhance the scene by manipulating the nametags to appear as if they are objects within the original footage. This means making them appear to float right in front of our subjects but behind the laptops, tilting them at the same angle as the people, and mimicking the level of blur that occurs as the camera passes by the subjects. All of this can be accomplished with a combination of rotoscoping and 3D camera manipulation, which we’ll cover below.
What is Rotoscoping?
Rotoscoping is the animation of masks across a selection of frames. This essentially allows you to take a 2D image and create a multi-layered space. You’ll then be able to edit the foreground object and background image separately. This allows for objects to go in between your foreground and background, or to make visual edits, or remove the background completely.
Rotoscoping Methods
There are two ways you can go about rotoscoping in After Effects: masking with the pen tool, or using the Rotobrush tool. For this tutorial, we’re going to be focusing on using the Rotobrush tool, but we’ll quickly touch on masking.
Masking
Masking is a technique that is found across several of Adobe’s creative programs. The first thing you need to do is duplicate the layer you want to rotoscope and rename it; we rename ours “roto laptops” in the example.
Next, use the pen tool in After Effects to create an outline of whatever object you’re trying to isolate in the foreground. Once this is done, your roto layer will be just the foreground, and the original layer will act as the background.
The next step is where this method becomes extremely time-consuming. You’ll have to go frame by frame, and adjust that mask so it follows any movement that occurs with your object. If you’re interested in learning how to use the masking technique more in-depth, check out this tutorial from Motion Array.
Using the Rotobrush Tool
The Rotobrush tool is a much faster way to rotoscope since it uses After Effects software to speed up the process. Essentially, it allows you to paint over the object you want to select and then After Effects’ artificial intelligence will automatically detect the edge of whatever object you’re trying to isolate. It will then propagate that selection across the timeline automatically, instead of having to do it manually with masking.
Follow these steps below to Rotoscope objects.
- Duplicate the layer you want to Rotoscope, and rename it for clarity.
- Double click the layer to open it in the Composition window.
- Select the Rotobrush from the top menu.
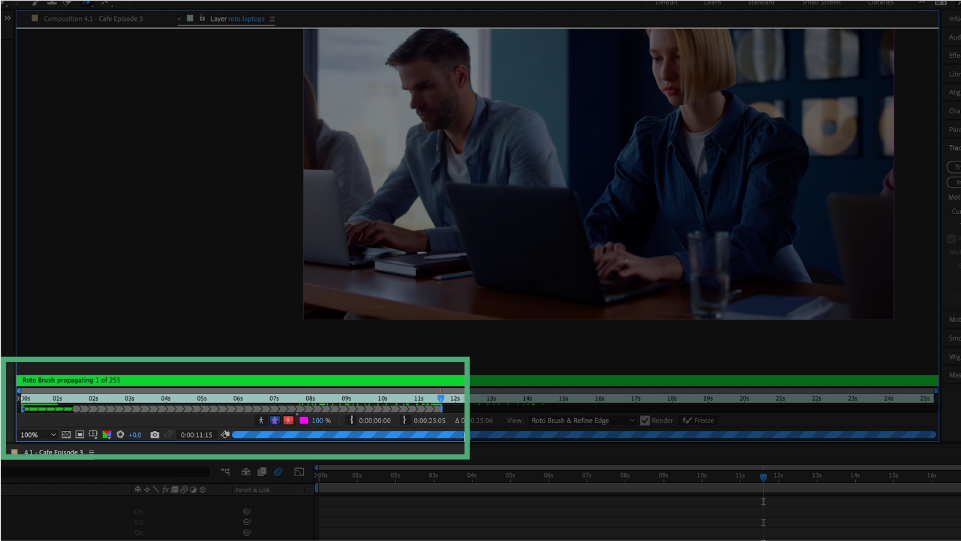
- Paint over the object(s) you want to isolate for the foreground.
- Press and hold the Option key to paint over areas of the mask that are outside of the object you’re masking.
Your selection, or mask, will show up as a purple outline on your footage. When using the Rotobrush to add to the mask, it will show up as a green icon. When you’re holding the Option key to remove masking, it will show up as a red icon. Fine-tune this outline until you’re satisfied with your selection before moving forward.
Unless told otherwise, your rotoscope will be applied to the entirety of your layer duration. If you just want it to be applied to a specific part, be sure to adjust the slider at the bottom of the Composition viewer window. For our example, we only need it to last as long as the nametags are visible within the frame.
Adjusting the Rotoscope Layer
At this point, you can return to your full composition to see exactly how Rotoscoping has affected your project. If you’re following along with our Example Project or applying these principles to your own project, you should see that the nametags are now positioned behind the laptops as if they are an object floating in 3D space in the video.
When you toggle off the background layer, using the Eye icon in the far left of the Layers panel, you’ll see that just the laptops are masked out from our roto layer, which is why it appears to be over the nametag layers.
Next, click the arrow next to effects to reveal parameters you’ll need to make fine-tune adjustments to the roto layer. There are two main adjustments you can make to help make this effect look more realistic are feather and motion blur. Feather will expand your mask in a way that will hide some of the inconsistencies associated with the edge of your mask. Motion blur adds a level of blur that makes movement seem more natural to the eye.
Once you’re happy with the way it looks, you’re done with Rotoscoping. Since After Effects will have to render the roto mask layer every time you move the play head, you can turn this layer off for now while we move on to the next section, Animating in 3D space.
Animating in 3D
This next section will focus on adjusting objects so they better match the scene you’re trying to add them to. For our example project, that means changing the rotation and blur of our nametags to match that of the background. There are two ways to do this: manually with keyframes, or by adding a 3D Camera to move the object in 3D space.
Manual 3D Space Movement
This is fairly similar to the adjustments we made to our objects in the first After Effects episode. We will be adjusting the transform parameters using keyframes to get the desired look we want. Where things change is when you enable the 3D option for your layer as seen below.
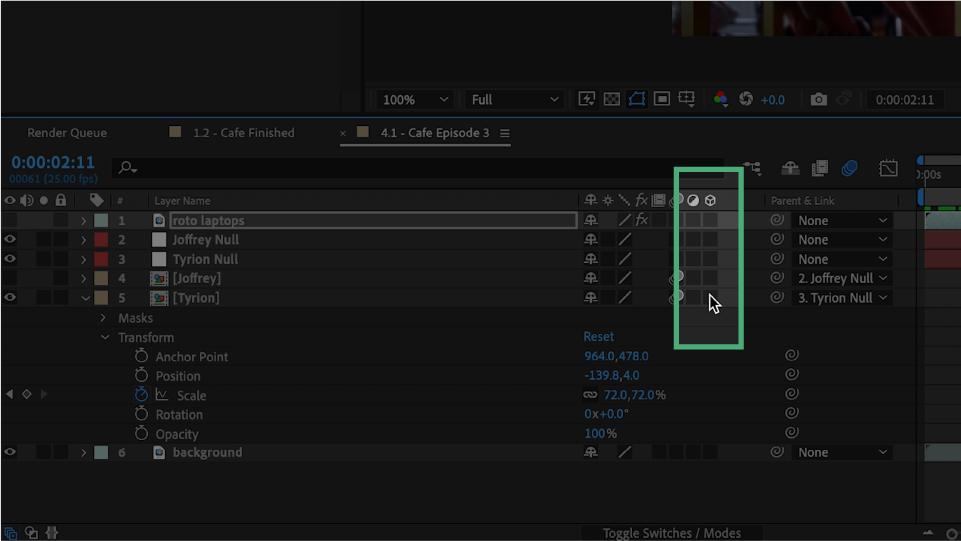
This allows the layers’ transform parameters to be adjusted in all three dimensions, X, Y, and Z. You can now use keyframes to adjust parameters, like Y rotation, to have it match the angle of the people in the background. Once you have the right angle, we can move on to adding the blur effect.
In our example scene, we want the Tyrion nametag to mimic the focus the camera has while it moves through the scene. We can do this by adding Camera Lens Blur to the nametag layer from the effect panel on the right side of our screen. Using keyframes we can add a keyframe for when the camera is in focus, keeping the blur parameter at 0, then add a keyframe at the beginning and end of our scene and match the blur value to what we see in the footage. This will have to be trial and error to see what looks the best.
Once this is complete, you can turn on the roto layer and you’ll be able to see your finished product in full. The adjusted nametag should slide behind laptops, blur with the footage, and be positioned at the right angle with the scene.
3D Cameras
The second technique for achieving this look is a bit more advanced and requires the use of 3D Cameras in After Effects. Keep your roto layer off throughout this process to help with render speeds.
The 3D Camera tool allows you to add a layer that acts like an actual camera within the program. Go to the Layer menu, New, Camera…, to add a camera to your composition. This will open a new menu that gives you complete control over your virtual camera, including sensor size, focal length, depth of field, aperture, F-stop, and more.
For our purposes, we can leave almost all of those options alone, except focal length which we’ll keep at 50mm. The Camera 1 layer will now show up in the layer panel.
Viewing the Camera
You may not see any differences right away once the camera is created, and for good reason. Only layers with the 3D option enabled will be affected by the camera. For this project, we’ll turn on just the Tyrion and Joffrey nametag layers.
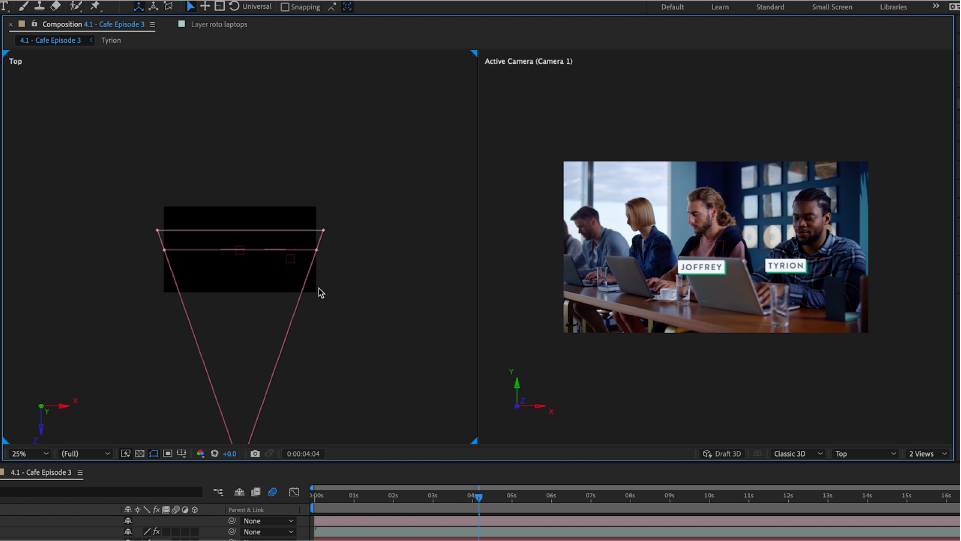
Furthermore, to see what the camera is doing, you’ll need to change the Composition window view from 1 View to 2 Views in the bottom right corner. This will display the active camera view on the right, and the top down of our camera’s field of view, composition, and other elements in our composition on the left.
Adjusting the Camera
The power of using 3D cameras becomes apparent when you start adjusting the transform parameters in the Layers panel. Since we want our nametags to mimic the footage, we can change various camera transform parameters to match the scene.
For starters, we’ll change the camera orientation to mimic the 45-degree angle seen in the footage. You can see with the top-down view how the camera’s viewing field is crossing the elements in your composition.
To further match the look of the footage to your objects, open the Camera Options drop-down under the transform parameters in the Layers tab. This lets you dive into all the settings of an actual camera, which you can adjust to make the nametags really blend into the scene.

As you can see in the image above, the number of options for manipulating the camera are vast, and very similar to how you would adjust camera settings in real life. For a refresher on camera settings, check out the Cameras section in our Video Library.
For our example, we’ll be adjusting our focus distance parameter to have our objects come into focus when they cross the focal plane and aperture to adjust the blur when not in focus. This will take some back and forth to get just the right look, and you can monitor how this affects your objects in the Composition window.
Once you’re satisfied with the look of your objects, you can turn your roto layer back on and see the final result. Just like with the manual method, you’ll see your nametags slide behind the laptops, go from out of focus to in focus, and also be aligned as if they were filmed in line with the rest of the footage.
Learning Adobe After Effects is a huge undertaking that will take lots of time and practice to master. Adding rotoscoping and 3D cameras to your tool kit will certainly come in handy as you continue to explore and develop your skills in the program. Be sure to subscribe to the SproutVideo Newsletter so you don’t miss out on our next tutorial.