Live video is widely available for consumers as part of most major social media platforms, including Instagram Live, YouTube Live, Facebook Live, Twitch, and others. However, these public options have significant drawbacks for businesses, especially if the content you want to broadcast is intended just for employees or a select audience.
The good news is that SproutVideo just added support for live streaming to our platform. You can now leverage our video marketing and privacy tools for live streaming as well as on-demand video.
In this episode of our How To Video: Live Streaming series, we’re looking at what goes into producing a professional-grade live stream, and the tools you’ll need to pull it off. Forget shaky handheld live streams, we’ll show you how to make it look and sound polished every time.
Live Streaming Overview
Watch as Nick LaClair, Creative Director at SproutVideo, explains the six simple steps you need to take to start live streaming today. He covers how to hook up a professional camera for live streaming, and optimize your settings for broadcasting online.
Keep reading for an in-depth guide to each of the steps covered in the video above.
What is Live Streaming?
The terms “broadcast,” “live,” “video,” and “streaming” are thrown around almost interchangeably when it comes to online video. So, what exactly do we mean when we say “live video”?
A live video is a feed from a video source, typically a camera, that is converted into a format that can be streamed online through a player and delivered to viewers in real time. While most people understand live video to mean that the events on camera are also unfolding in real time, a live video can also consist entirely of pre-recorded video footage.
So what is the difference between a live video and an on-demand video? A live video broadcast occurs at a specific time and place, and can’t be accessed asynchronously by viewers. When you start watching a live video, you won’t necessarily start watching from the beginning of the video. Instead, you’ll start watching from the point at which you tune in. As noted above, the video source can be a camera feed or pre-recorded video files, and the live video itself is encoded in real time for viewers.
In contrast, an on-demand video has already been recorded, uploaded to the web, and encoded for playback online. By definition, it can’t include events unfolding in real time. It can be viewed by any visitor to the webpage where it is located at any time. Viewers do not need to tune in at a specific time in order to watch the video, and typically start watching from the beginning.
Live Streaming for Business
The idea of going “live” has been around for decades. We’ve all experienced live TV, and live broadcasts of sports and events. Increasingly, live video is also becoming the norm on social media as well. It’s enough to make businesses feel like they’re missing out, because most live streaming tools aren’t particularly optimized for business use-cases.
There’s the perception that live streaming requires a lot of expensive equipment if you want to do more than just stream from your phone. On the other hand, if you’re trying to stream from your phone, there’s low expectations for video and audio quality. Finally, most live streaming options are geared towards widely shared, viral moments, which isn’t a fit for all business video needs.
Here’s a breakdown of how you can start live streaming for your business, today, with minimal equipment. We’ll show you exactly how to set it all up and achieve a professional result.
Equipment for Live Streaming
The equipment list for live streaming is shorter than you might expect. If you’re already creating on-demand videos, you might already have nearly everything you’ll need for live streaming. You’ll need the following:
- Computer with an internet connection – processes the video and delivers it online to viewers
- Video source – a camera, for a live video feed, or alternatively, a pre-recorded video file to broadcast
- Microphone and lighting (technically optional but strongly recommended)
- A video capture device – converts the signal from the camera to a webcam so the computer can process it
- Encoding software – converts the video feed into a format that can be streamed through a player online
- A live streaming platform – provides a player and sharing tools to deliver your live video online to viewers
1. Computer
While we won’t spend a ton of time on this particular point, it’s worth noting that live streaming video is very resource intensive for computers. If you are already producing video, it’s likely your existing computer will be up to the task.
However, you might want to consider upgrading if you’re on an older machine, or if you are attempting multi-camera setups with extensive graphics, or other factors that can increase the demand on your computer’s processor.
2. Video Source
Another essential component to live streaming is usually a camera, or another video source, like a pre-recorded video file. When working with a camera, you’ll be converting the signal from the camera into a format that can be delivered to viewers online in real time. When working with a pre-recorded video, you’ll simply be selecting the video file to be encoded in real time for viewers instead.
If you’re working with a camera, you’ll want the best quality camera you can get your hands on. The quality of your live stream is directly tied to the quality of the feed from the camera. Typically, for a professional result, you’ll want to use a DSLR/Mirrorless camera at a minimum.
Camera Settings for Live Streaming
If you’re using a higher quality camera, you’ll need to tweak some settings before you can start to broadcast in order to obtain a clean video feed. First, make sure your camera is recording in 1080p and either 30p, 60p, or 60i frames per second.
Then, disable any monitor display items. Some camcorders have settings to adjust for external outputs. If not you’ll have to go through the settings and turn them off manually.
3. Audio and Lighting
Once you’ve got your camera settings squared away, make sure your lighting and audio are up to professional standards.
For audio, almost any external microphone will get you better results compared to the built-in microphone on your camera, if it has one. That’s partly because when filming, you’re usually sitting at a distance from your camera. Most microphones work best when they are as close as possible to the audio source they’re meant to capture. Lav mics or boom mics are both great choices, and we have a How To Video episode with further guidance on when to use different microphones if you’re not sure which is right for your particular setup.
If you’re using an external microphone, the biggest challenge is making sure your audio is in sync with your video. Since your video will be streamed live, you can’t just fix it in the editing room – it has to be right from the start.
The easiest option is to plug the microphone directly into your camera.
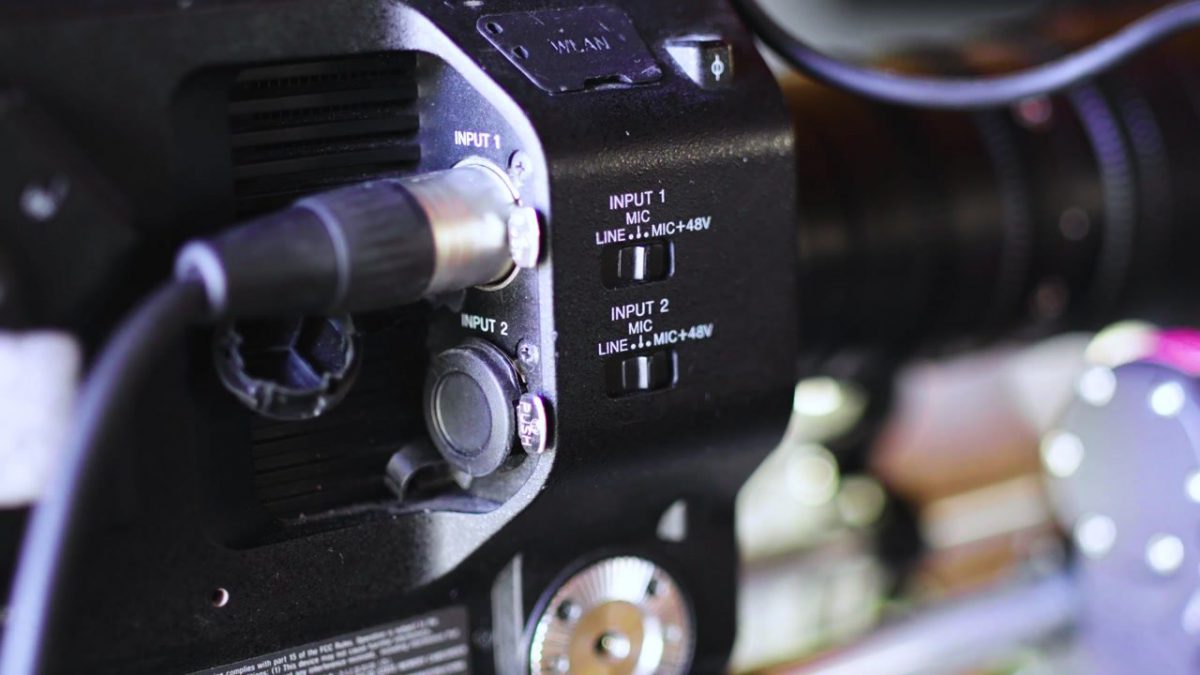
Otherwise, you can plug it into your computer, and adjust the sync settings as needed using the encoding software you’re using (more on that below).
Lighting
There isn’t anything particularly different about lighting for live streaming compared to on-demand video. It’s just worth mentioning because it will help your live stream look more polished if you get it right.
Refer to our guides on achieving flattering lighting in an office environment, or setting up classic three-point studio lighting if you aren’t sure where to start.
Another cheap and easy option is to face a window when filming. The diffuse light is usually flattering, and it’s a simple shortcut to great lighting.
For more tips on looking your best on camera, even without the help of coworkers, watch our episode on “How to Film Yourself for a Professional Result.”
4. Video Capture Device
A video capture device takes the HDMI or SDI signal from your camera, and converts it to a signal your computer can recognize via USB or thunderbolt. This essentially lets your computer recognize your camera as a webcam. For our purposes, we’re using the AJA T-Tap, but there are many options on the market.
Usually, these devices are simple to operate. Connect the video capture device to your camera(s) and your computer, and that’s about it.
5. Encoding Software
If you aren’t using a social platform like Facebook Live or YouTube Live, you’ll need software to encode your live video feed for delivery online. There are many choices available, including OBS, a popular free tool, and Wirecast, as well as premium paid options.
While there are some differences between the various encoding software options, the basic functionality is very similar. For the purposes of this guide, we’ll focus on OBS because it is both popular and free to use.
OBS Software
Open Broadcaster Software or OBS is free open-source encoding software. It allows you to control your video feed before sending it along to your streaming platform.
OBS allows you to do some very impressive things when it comes to customizing your broadcast. Scenes are the basic elements of your broadcast. You can set them up prior to streaming, which enables you to switch easily between cameras, or pre-recorded video files, like presentations, or screencasts.
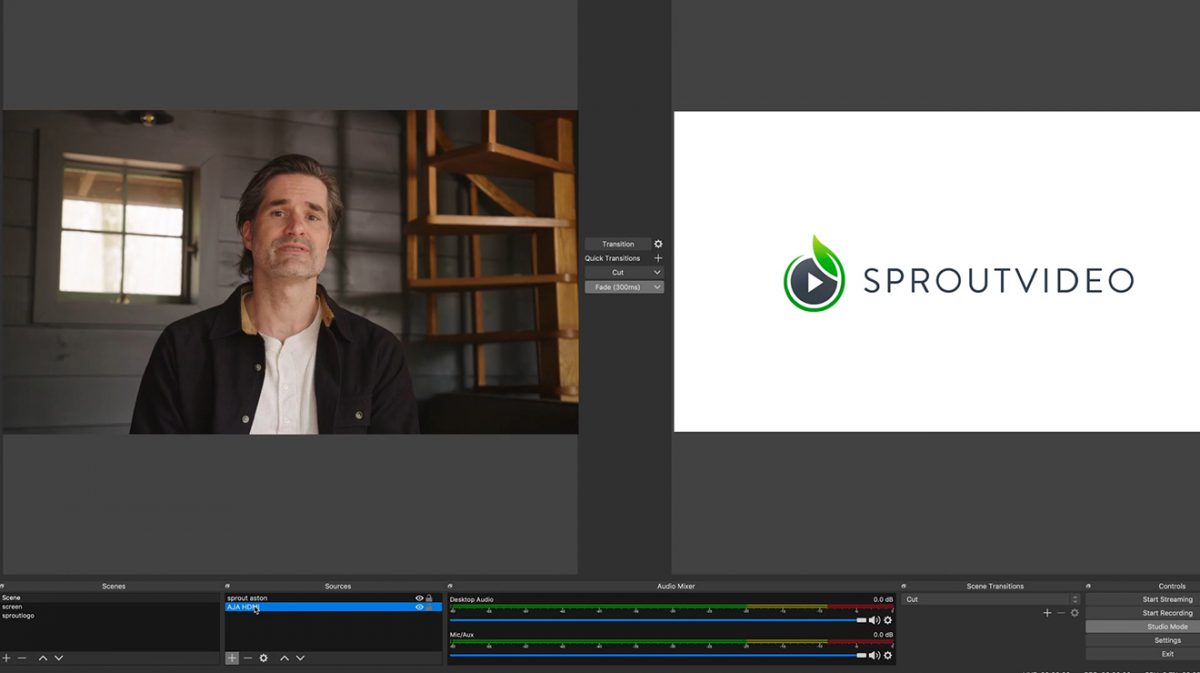
Within each scene, you can add layered effects, color grading, audio sources, and more. You can also apply transitions between scenes to make your stream look even more professional.
6. Streaming Platform
The final step in this process is determining how you’ll be sharing your live stream. It comes down to your goals for your live stream and the audience you are trying to reach.
Social Platforms
If you want to go viral or share a live video with the general public, social platforms are a great choice. While the potential reach is a big plus, there are important drawbacks to consider:
- You’ll have limited control over how your live stream appears on the platform
- The player is usually not brandable, or very customizable
- Ads might be shown before, during, or after your live stream
- Viewers might be pointed to other content when your live stream is over, or distracted by other content on the platform while watching
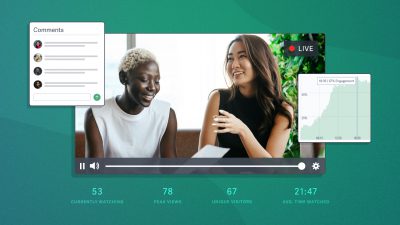
- Analytics are limited and usually very high level
Professional Video Hosting
When working with a professional video hosting platform, like SproutVideo, you have much more control over how your live stream is shared with your audience, as well as the branding, appearance, and behavior of the live stream player.
For example, you can use video marketing tools to capture leads and send them to an integrated marketing platform, display an in-player CTA with a link, drive organic traffic with SEO tools, or display a post-play CTA when your live stream concludes. You can also encourage viewers to share your live stream with optional player controls.
Alternatively, you can limit your audience very specifically with live stream privacy settings, like password protection or viewer logins. You can also control where your live stream can be shared with domain, location, and IP address whitelists.
Whether you’re using your live stream for marketing, or broadcasting a live stream for employees only, you can customize the landing page, or embed it securely on your website. Either way, you have total control over the branding and appearance of the live stream you’re sharing.
Going Live
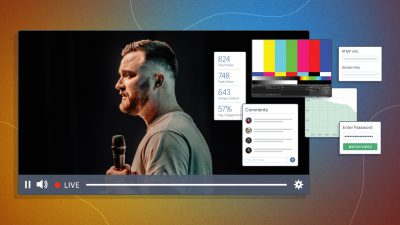
Connecting OBS to SproutVideo for live streaming is very straightforward. You simply have to input your RTMP URL and your stream key into the RTMP server settings in OBS. It’s important to treat your stream key as securely as a password. It’s what enables you to stream directly to the player.
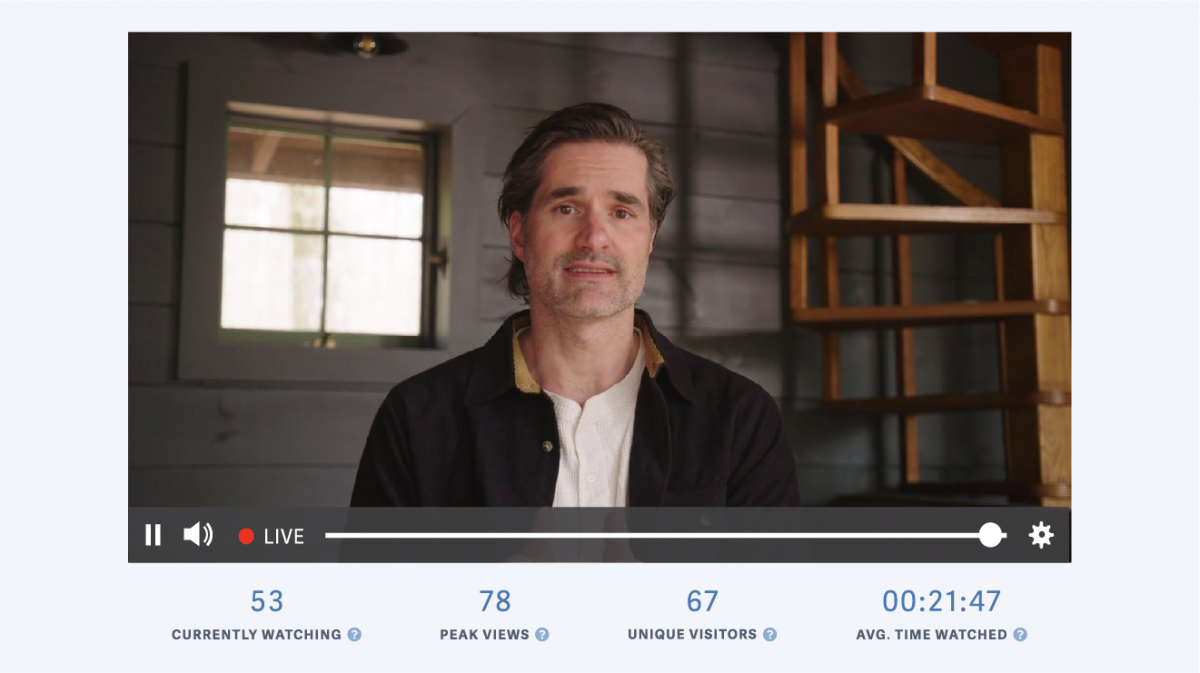
Before you start your live stream, the SproutVideo player will display your poster frame and a message that explains to any waiting viewers that the live stream has not yet commenced. Once you start streaming, the SproutVideo player will automatically detect your broadcast, and start delivering it to viewers.
And, that’s it! You’re ready to live stream to your audience.
If you’d like to see these tools in action, join us for a live demo of our live streaming features on June 30th at 1 PM EDT. We’ll show you exactly how live streaming works on the SproutVideo platform, and cover FAQs and ways your business can benefit from live streaming.