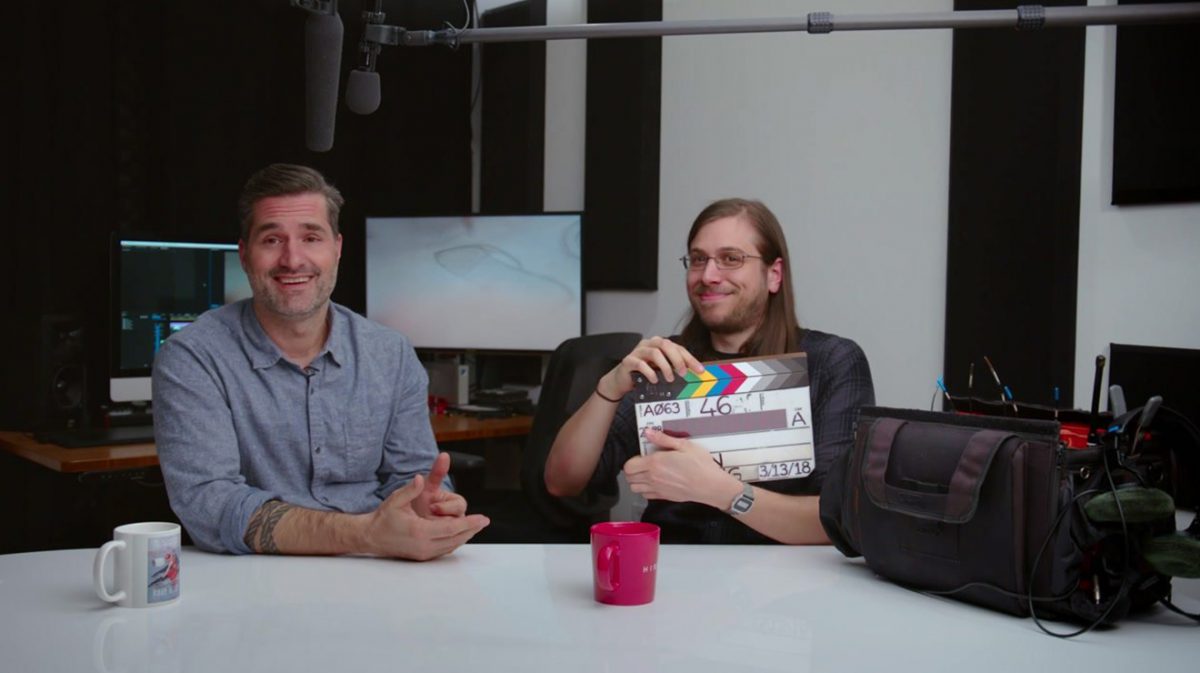
Today, we’re tackling all the advanced audio techniques that separate great audio from the merely good. Our How To Video: Audio series host Nick LaClair is joined by professional audio technician, Mike Infante. Together, they’ll walk you through perfecting your mic placement, different mic pickup patterns, and dual recording systems. Make sure your videos sound as good as they look with this in-depth tutorial.
Advanced Audio Tutorial
In this episode, we’re going deeper into selecting the right microphone, and placing it with your subject. We’re also going to address ways you can prevent common audio issues, like clipping or distortion. Finally, we’ll cover why dual system audio recording might be worth your while, and how to use the gear required.
Once again, we looped in Mike Infante, who you might recognize from our last audio episode where he helped us cover when to use which popular type of mic. He’s an expert production sound mixer from Lakhota Film.
As you can see, there is a lot more to great sounding audio than choosing the right mic. Keep reading for a deep dive into each part of the process.
Boom Mic Placement and Types
Proper positioning of your boom mic is the first and easiest way to help ensure your mic clearly captures your speaker’s vocalizations.
To begin, set up the mic directly in front of your speaker. Angle your boom mic towards them at a 45 degree angle, and as close to them as possible without actually having the boom mic in the shot. The 45 degree angle affords your speaker the ability to move around a bit as they speak without sacrificing your audio’s consistency.
As a reminder, when you hear “boom mic”, all that really tells you is that you have a mic on a boom. The actual mic in use will vary according to your needs. Two commonly used boom mics are shotgun microphones and cardioid microphones.
Shotgun Microphones
One of the most popular boom mics you’ll encounter is the shotgun microphone. This is the longer, directional microphone we discussed in our last audio series post. It’s a great all-purpose tool.
Shotgun mics are popular because they can be positioned farther from your subject than other types of mics. And therefore perform well in a wider range of circumstances than other mics.
This has to do with their pickup pattern, also known as a polar pattern. Shotgun mics mainly capture sounds from directly in front of them, though they also pick up some sound from the rear and the sides. Depending on what you’re filming, they make a solid choice for many types of shoots.
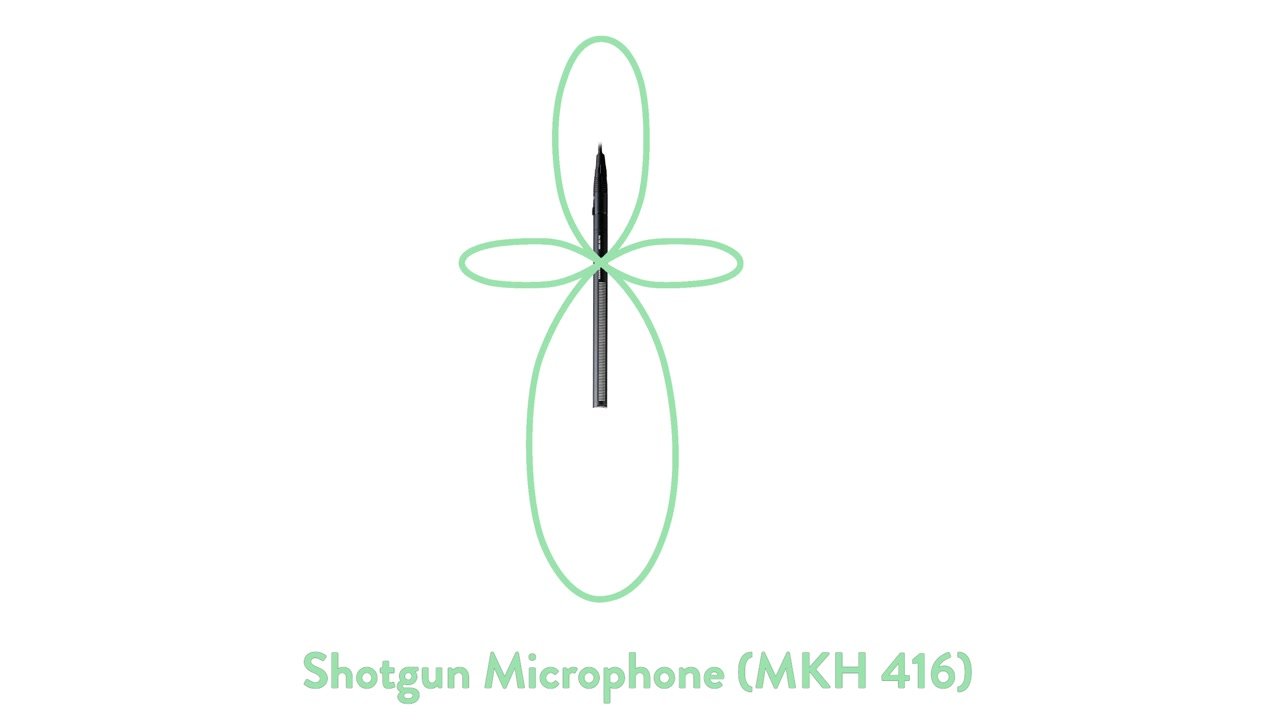
Limitations
Although this type of mic can be really versatile, it does not perform as well “off-axis.” Meaning, if your subject shifts to either side while speaking (versus speaking directly at it as you initially positioned it), you’re going to notice the inconsistency in your audio. This may not matter for your shoot, but if it does, it can simply be something for you and your speaker to keep in mind while shooting
Hypercardioid Microphones
The other microphone you’ll see used on a boom is a hypercardioid microphone, a type of cardioid microphone. Cardioid microphones are named for their heart-shaped polar pattern. A hypercardioid mic is most sensitive in the front, and reduces noise coming in from the sides and rear.
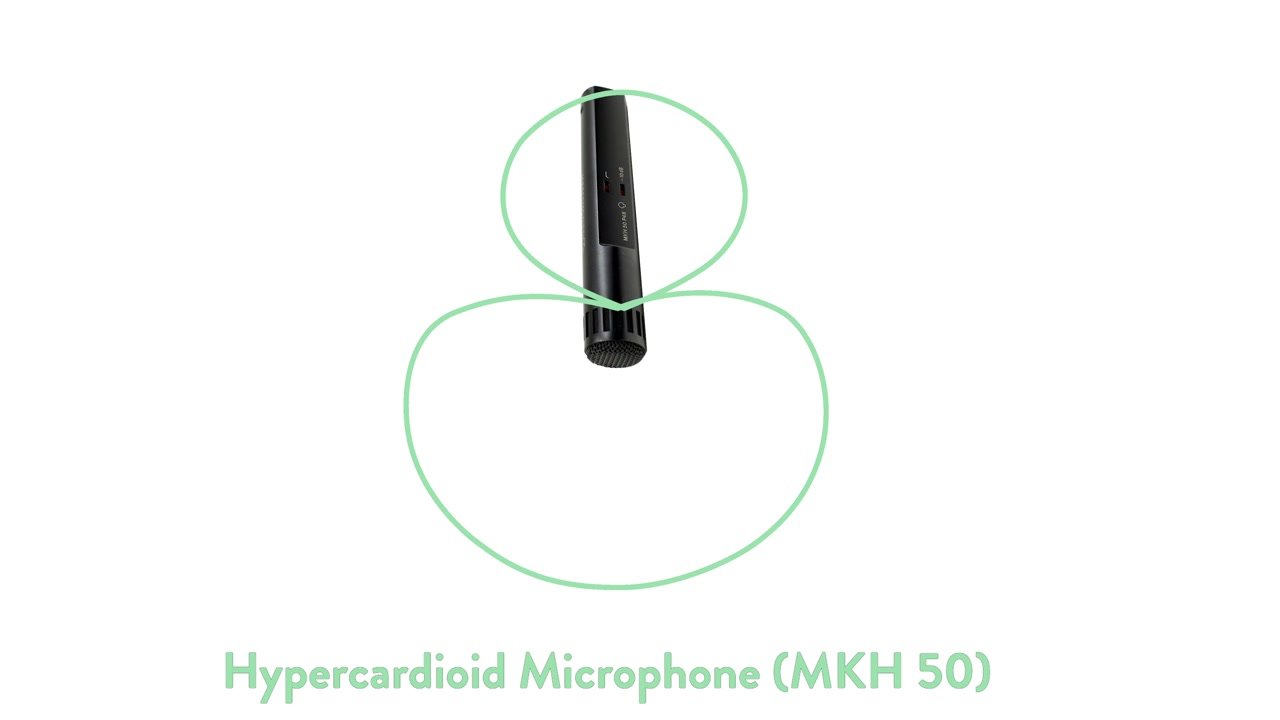
As a boom mic, cardioid microphones capture clear, rich sound, with minimal noise from the room. The mic’s proximity to your speaker will determine how much space they have to move around without affecting its ability to pick up the sound of their voice consistently. Still, its polar pattern allows more wiggle room than the shotgun mic.
For all those reasons, it’s the mic of choice for most professional audio technicians for indoor shoots, especially for vocal or speech purposes.
Levels and Limiters
Microphones are only part of the puzzle. Once you’ve got the right mic in the right place, there’s still more to be done to ensure you’re capturing the best audio possible. That’s where levelers and limiters come in to play.
Levels
Audio levels are balanced by adjusting the gain on your recorder. It’s important to set your levels so the audio doesn’t clip and distort. Clipping (or peaking) occurs when your audio suddenly increases in volume, and becomes distorted.
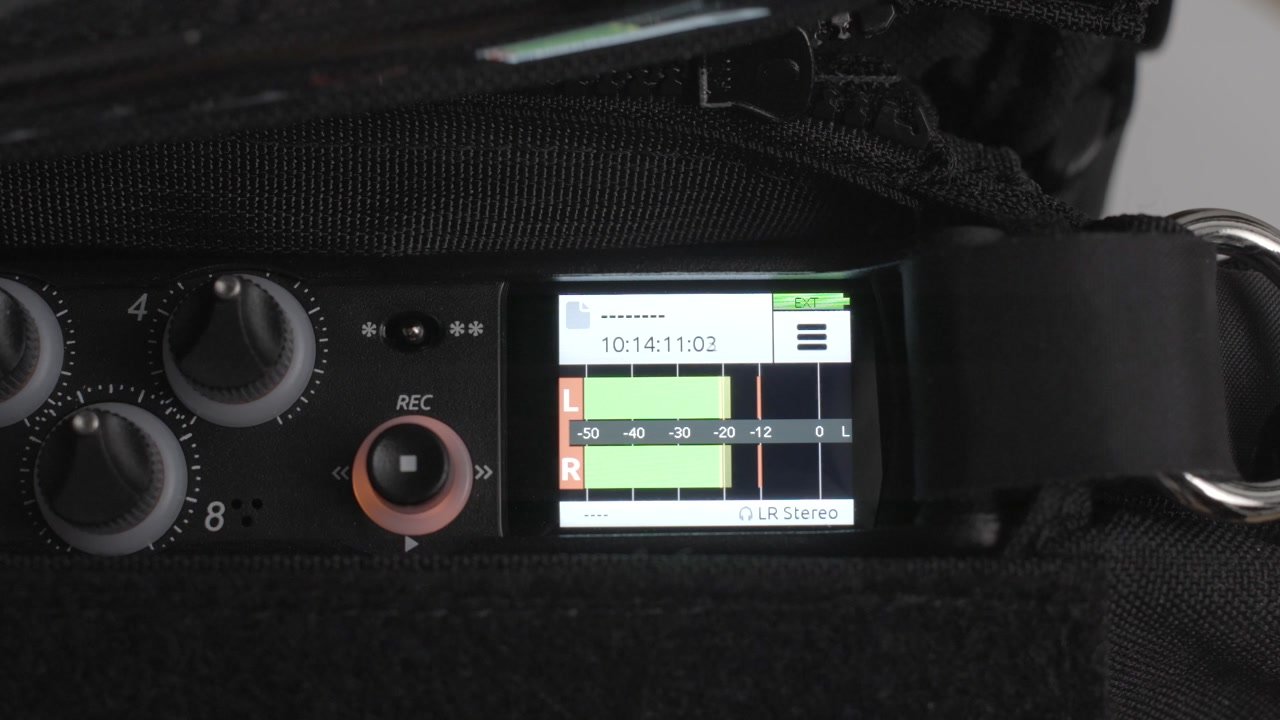
It’s better to err on the side of caution and set your levels slightly lower than you might want to use in the end. You can always bring them up in post, but you can’t save audio that is too loud and clips (or distorts). Mike often sets his levels so the audio spikes at -18 dB.
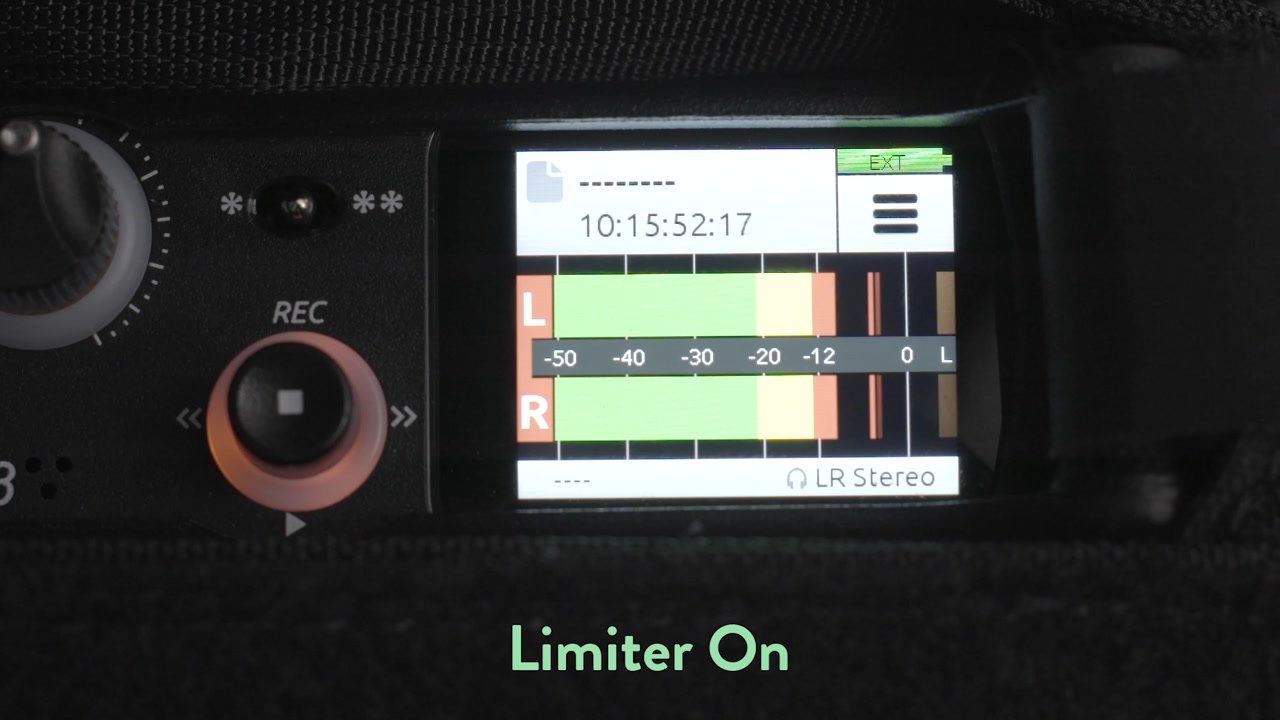
Limiter
A limiter works differently to help you control your audio range. True to its name, a limiter will limit the level of a signal to a certain threshold by lowering the gain automatically. As mentioned above, peaks or clips in sound can distort your audio. That won’t happen if you set your limiter threshold properly.
Dual System Audio
Recording your audio separately from your video and syncing them later is known as dual system audio. Why would anyone want to go through the extra steps to record separately? As Mike explains in our video, the benefits mainly come down to having more advanced audio options and better audio control.
In a typical setup, you’d have your camera and microphone(s) positioned just as you normally would. With dual system audio, however, the microphones record to a separate audio recorder.
Simple enough, right? Here are the details on how to set up a dual system.
Gear Needed
Other than your camera and microphone(s), you need an external recorder to capture your audio. You might also want a slate, depending on how you plan to sync your audio (more on that below).
External recorders offer specific advantages over recording to camera.
First, they typically have more inputs, which allow you to record more microphones simultaneously.
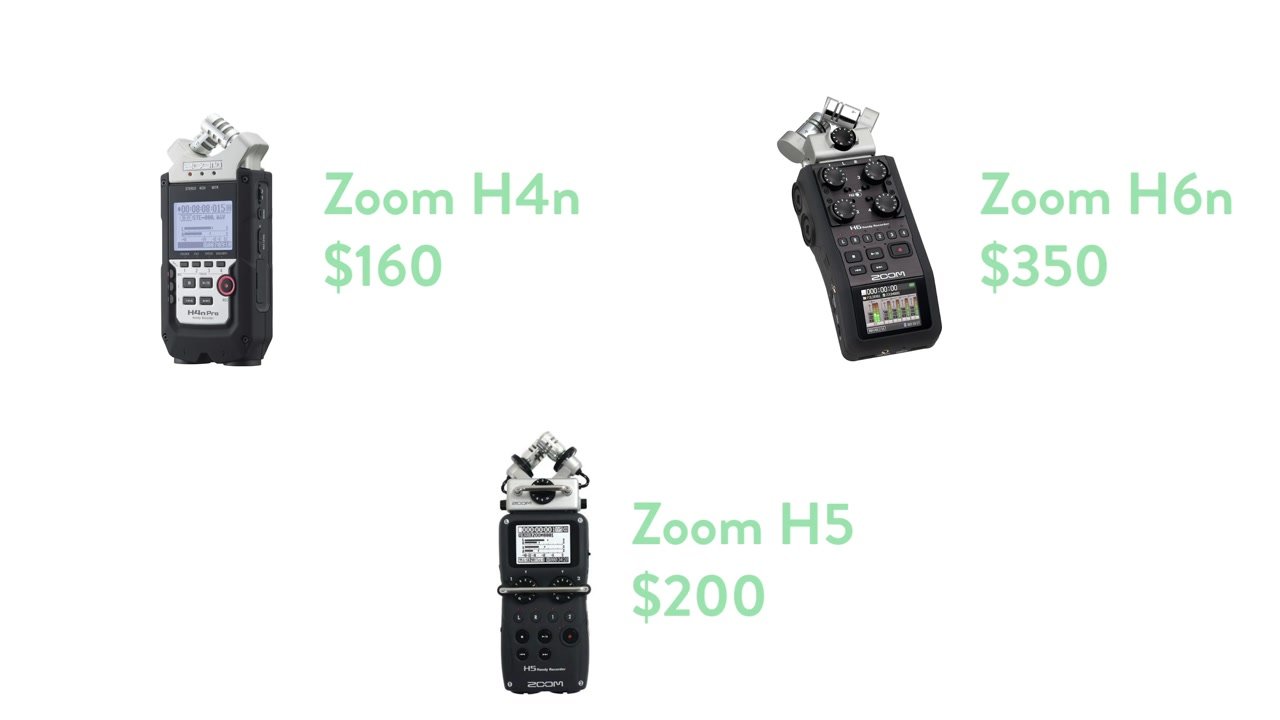
Additionally, most external recorders come with higher quality preamplifiers that provide a clearer signal with less low ambient noise. They range from the simple and affordable:
To the powerful and expensive:
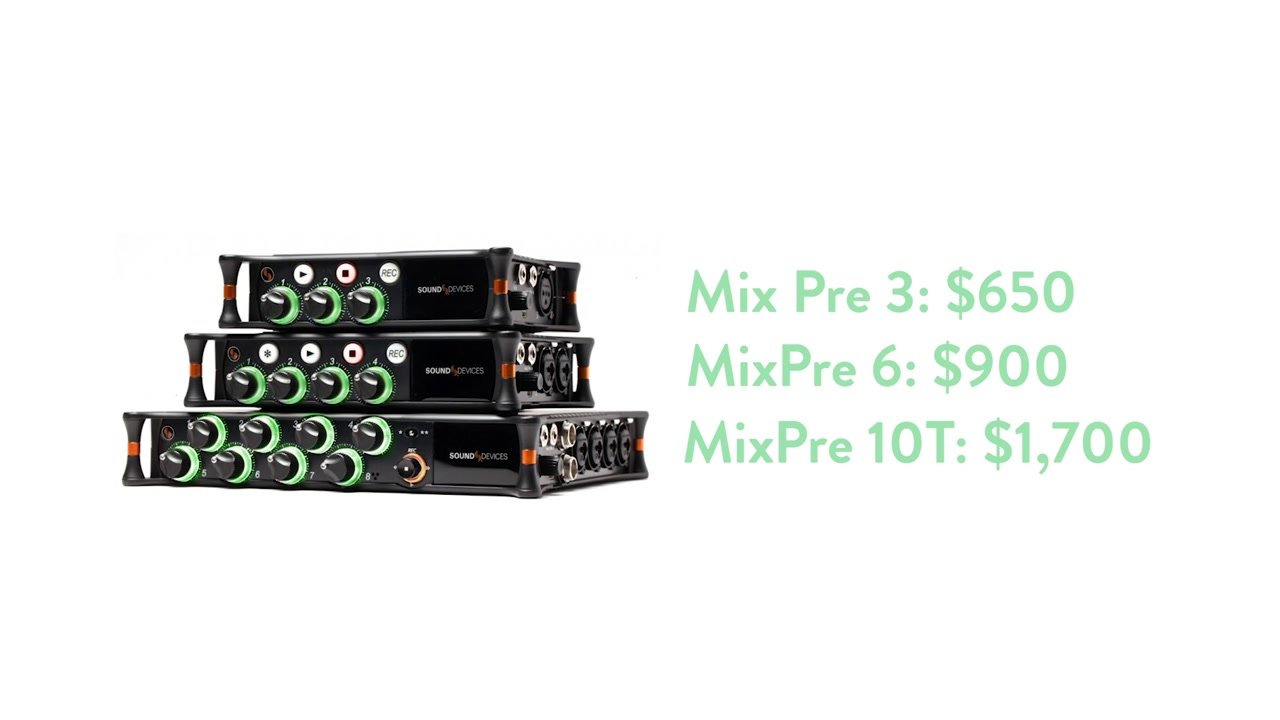
These dual system recording devices can be costly, though there are reasonably-priced options available as well.
Syncing Your Audio
If you decide to record with a dual system, there are three ways for you to sync your audio to your video.
Timecode
The easiest way is to sync is with timecode, which literally aligns the clock in your mixer with the clock in your camera. While this is the easiest way to sync, it’s only going to be available in more expensive camera and mixer options.
Software and Audio Waves
The second approach is to sync the files on your camera and the files on your mixer using software that matches their audio waves. Most popular video editing programs, such as Premiere, can sync audio and video using audio.
This process is straightforward if your camera’s “scratch” or “reference” audio is similar or identical to the audio from your recorder. However, when you’re recording something far away from your camera, the audio files might not match well enough to sync.
If you worry this may happen on your shoot because you know you’ll be recording far away from your subject, keep in mind that an easy way to combat this is to send an audio output from your external recorder back into your camera so they match.
Slate
The third way to sync is to slate. Yep, the old classic is still used today. All you need is a sound you can see and hear happening so you know exactly where to line up your audio and video.
You can use a clapboard (pictured in the video) or just clap your hands. That’s about as simple – and as inexpensive – as it gets when it comes to dual system recording synchronization.

Just as we explained in our first audio series post, more expensive gear is going to make your job easier. Still, to capture decent audio, you really only need to employ the basics: proper mic choice, and mic placement.
If you’ve made it this far in the post and watched the video above a couple times, you are well on your way to accomplishing better audio. A huge thank you to Mike Infante for sharing his insights with us!
Be sure to check back for the third post in this audio series where we’ll give you some post-production tips and tricks for making the most of your audio during the editing phase. Of course, we’re always listening in the Comments and on Twitter @sproutvideo if you have any questions about what we’ve covered today.