Today’s guest post comes from Zack Ford, the owner of Barbaric Media, a video production studio based in Manhattan.
I am shooting films with vibrant picture quality and crisp sound design, and I am doing it with an iPhone 6s. Using a camera rig I invented, and utilizing Adobe Premiere for my entire post-production process, I have turned my small Manhattan studio apartment into a production studio capable of making powerful content. I set it all up for less than $2,000 and I handle all aspects of production myself. Here’s how you can do it, too.
I founded my production company, Barbaric Media, partly as a thought experiment in response to the new-normal media paradigm that has emerged around the current generation of Instagrammers and Snapchatters. This generation takes the concept of individual oversharing to new extremes, with many of them becoming their own brand. In that context, I wanted to see what I could accomplish as a one man army running my own video production studio.
With just one person in charge of branding, marketing, design, operations, and all aspects of video production, you can only do so much, so I alchemized my limitations into opportunities. When I needed a logo, I drew it myself. When I didn’t have $10,000 to splurge on the camera and lenses I wanted, I invented a rig for my iPhone 6s to utilize its 4K video capability. Here are the details on my rig, and how I shoot, followed by my post-production workflow.
My Smartphone Rig
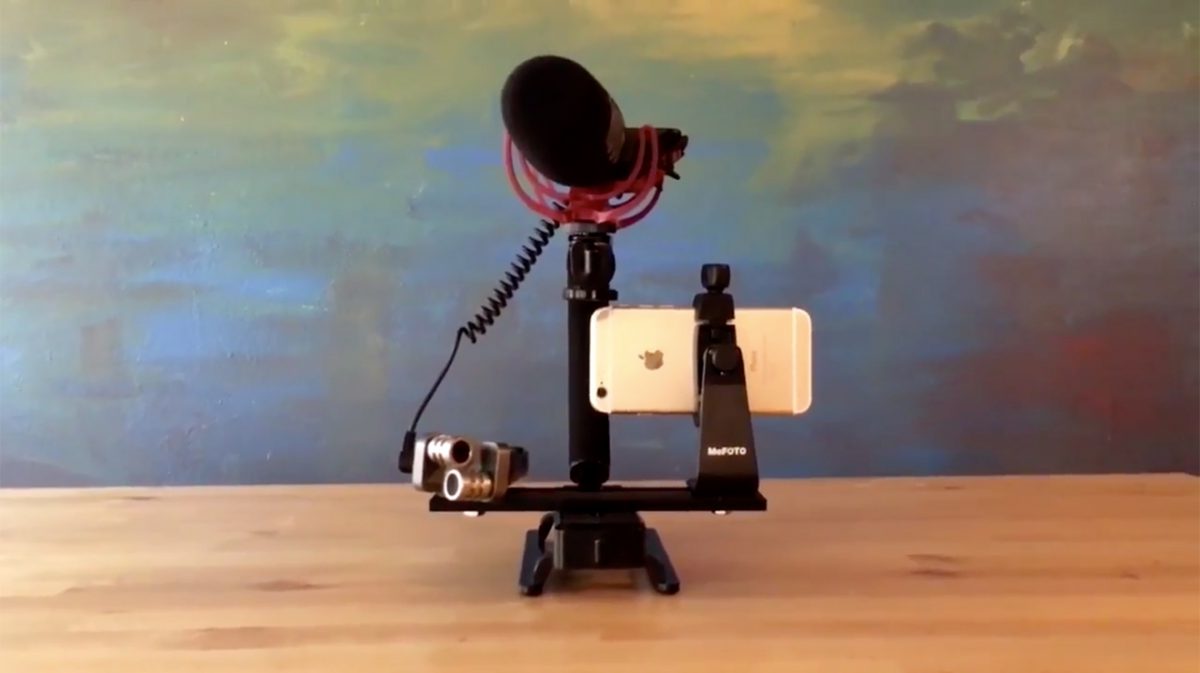
In my experience, the iPhone 6s really can produce professional 4K video, with the help of some accessories. In addition to my iPhone, I use a Rode shotgun mic, a Tascam audio recorder, an 8” extension bar from TetherTools, the Zeadio camera video grip, a tripod adaptor clamp for the iPhone from MeFoto, and a pair of bolts with a nut and a metal washer for each to hold everything together. I also keep a portable charger in my pocket to make sure my iPhone doesn’t die on long shoots – mine’s from TechLink. To see how it all comes together, check out this video:
If you do build a rig, beware – there are a lot of so-called ‘shotgun’ mics on the market that are deceptively built in the shape of a shotgun mic, but they actually record sound in a less-effective cardioid pattern, which is not directional and basically gathers your sound in a bloated bubble around the mic. Invest in a Rode shotgun mic like the one I use in my rig, and you will not have to worry about this issue.
How I Shoot Video on my Phone
I shoot all my footage with the aforementioned camera rig, making sure that the 4K option is selected on my iPhone 6s. One of my favorite parts about this setup is that the weight of the Tascam, balanced with the weight of the iPhone and its clamp, makes for very smooth handheld cinematography. For lighting, I take advantage of natural light sources as much as possible, though I occasionally use the Genaray LED-7100T light, which is priced around $300 and highly versatile.
For each take, after the iPhone and the audio recorder are speeding, I read aloud the file number on the Tascam, so that the iPhone mic records that spoken number. Then I snap my fingers once in front of the frame (an ersatz clapboard) – this will enable me to sync my sound later on. It’s all jerrybuilt, and it all works famously. (There are slate apps, which blink and beep, but the finger snap works fine and is much more convenient than juggling a second iPhone.)
Post-Production Workflow
When I’ve got my footage in the can, I import it into Premiere (after backing it all up on my G-Drive with Thunderbolt – good for editing in 4K). When you import into Premiere, make sure the media that your import is directed to is all saved in the very same folder, in the very same place, on the very same external hard drive, and not on your computer itself. Not only will this help you avoid disconnected media issues when you open and close your project, but you’ll also avoid fragmenting your computer.
Now, we can start editing. For each new sequence I create, I change the sequence setting from 1920×1080 to 1280×720 – this avoids a host of issues.
One hobgoblin I encountered was that the very first footage I captured with the iPhone recorded in .mov extensions. This ultimately decreased the image quality of that footage, as I had to convert those files into .m4v files through Quicktime in order to mesh them into the rest of the footage in my sequence. Miraculously, and without any conscious correction from me, the iPhone began recording in .m4v from my second shoot on – perhaps this spontaneous correction had something to do with the iPhone software getting a nudge after connecting with iPhoto during my first media dump, which I hadn’t done previous to my first shoot.
Next, without yet synching the Tascam’s .wav files, I edit my project using the less superior, inherent iPhone sound. We probably won’t use all of our shots, so it’s a thief of time to sync all of them up before we edit.
Color Correction
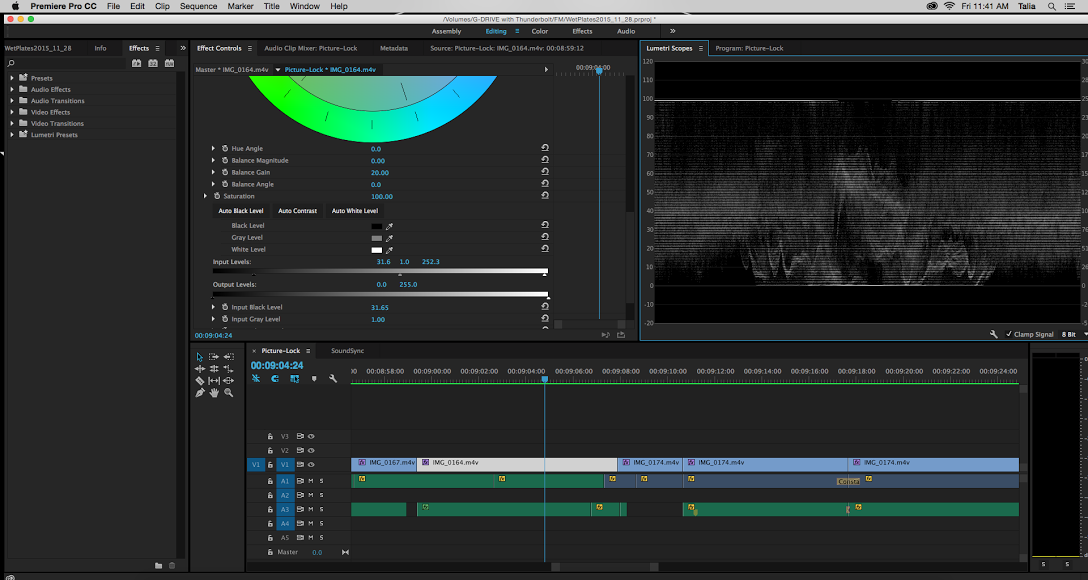
When editing is complete, I drag the Fast Color Corrector (FCC) filter onto each and every video clip in my picture-lock. I am not an expert when it comes to color correction, but this is a down-and-dirty trick to add a good deal of quality to your picture. After applying FCC to a clip, I select that clip, then select the Lumetri Scopes tab located right behind the sequence-viewing window, in the top right window. You’ll see a scarily scientific-looking graph: don’t be afraid.
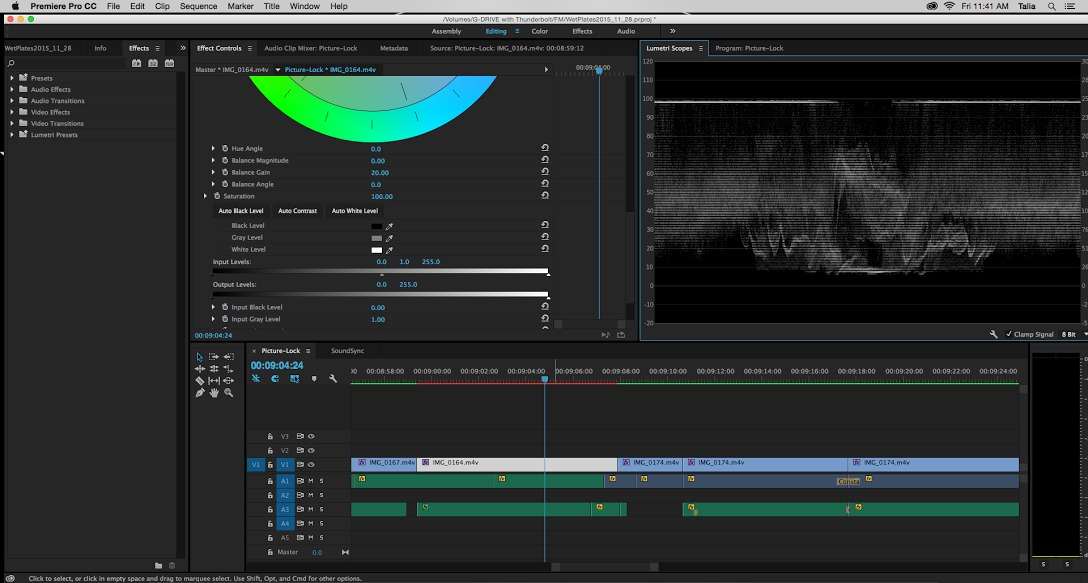
Next, I select the Effects Control tab in the bin-viewing window, the window to the left-adjacent of our first window. If you scroll down, past the colorful wheel, you’ll see a spectrum bar labeled Input Levels, which corresponds to the Lumetri Scopes graph. I slide the left black tab to the right, just until the mass of static-like information begins to crush into the bottom zero line of the graph. Then I slide the right white tab to the left, just until the top of the waveform begins to crush into the top 100 line. Now your whites and blacks should be truer, and your colors should be more dynamic.
If you now flip back to view your sequence image in the top right window, and select the Show Split View box in the left-adjacent window, you can evaluate just how much your picture improved.
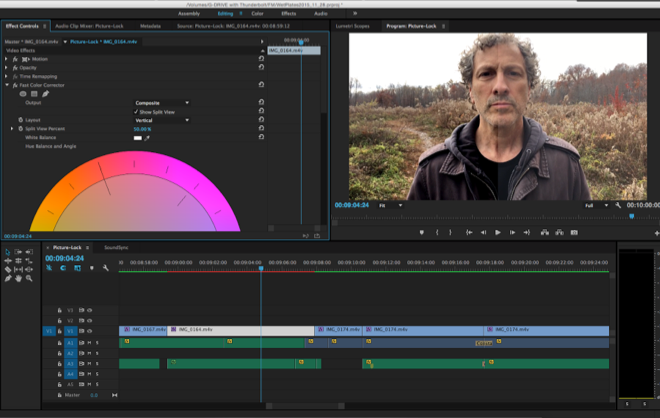
However, don’t forget to deselect that Show Split View box before you export your final video, or the demarcation line will also export (I made this mistake, and you can see it in the last shot of my “How To Make An iPhone Rig” video. Serendipitously for you, I am standing in front of a colorful wall, and you can see how the colors above the line pop more than the colors below the line).
Further, if you are going black-and-white with your film, the FCC can render your blacks inkier, your greys more silvery, and your whites more snowy.
Sync Your Sound
With my picture finalized, I now sync my sound. Although this process might seem tedious, I’ve received quite a few inquiries about how I achieved such sterling production sound. I firmly believe all the time invested in this phase is worth every second, just as the dollars invested in a good mic are worth every penny.
I jot down the file names of only the clips I’ve used in my final picture-lock (expand your sequence timeline if your clips are too short to reveal those file names). This list tells me which clips in my import bin I need to sync, and which ones I do not.
At this point, I create a new sequence titled Sound Sync, and I repeat the following process for each clip:
I go to the bin, locate the first clip on my list, and open it. Set the in-point precisely when you hear that fingersnap, using the decibel meter for accuracy – it should peak at the snap. Then I set the out-point just a few seconds after the in-point, and drag that picture to the Sound Sync sequence, sans sound.
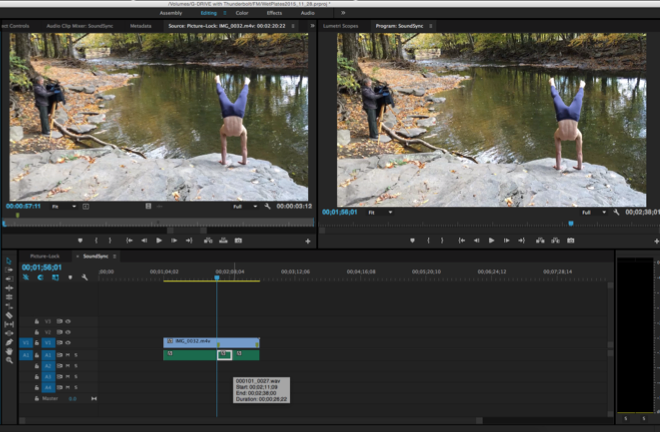
I know the number of the Tascam’s .wav file that clip should sync to, because I announced it for iPhone sound during the shoot, so I select that .wav file from the import bin, and again, set the in-point at the fingersnap, the out-point a few seconds after, drag that truncated .wav file down to my Sound Sync sequence, and snap its front-end flush with the film clip we dragged down a moment ago.
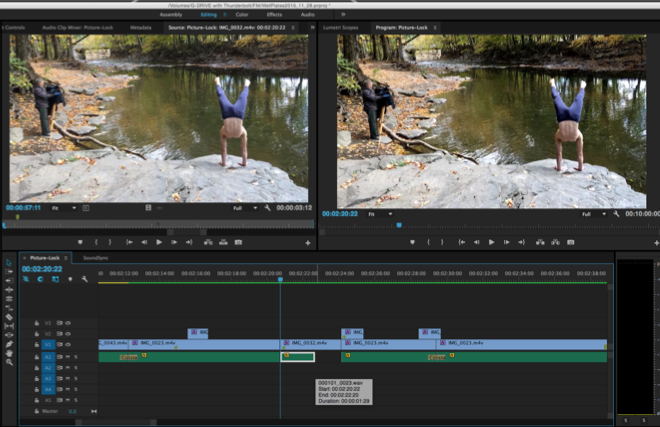
Now you’ve synced that sound, and with your new clip truncated to only a few seconds, it won’t take up too much space in your sequence, and you can expand and contract it within the sequence as you need it.
Do the next one, and the next one, and so on…
Finally, back in my picture-lock sequence, I place the timepoint line on the first frame of the clip I want to sync, and double-click that clip to display its initial frame. I return to my Sound Sync sequence, and scrub over that .wav-synced clip until I match the frame exactly. It’s a bit of a game: I might look for the line of a wall or a shadow in relation to the frame’s edge, of the placement of a subject’s fingers, or any other details that will help me match these two frames.
Now, with a replica image in both viewing windows, I cut out the sound I need from the .wav file, copy it, paste it under its corresponding image in my picture-lock sequence, and expand/contract the copied .wav’s backside until it is the exact length of its picture file. It’s makeshift, and it works brilliantly.
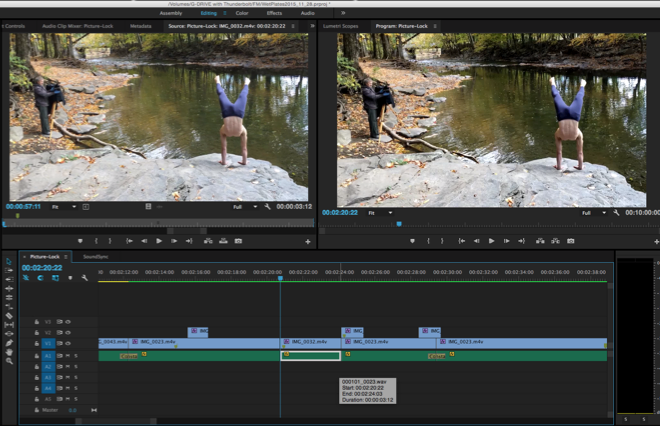
When I’ve synced all my sound, I put on some good headphones and set my computer’s volume to half, 8 out of 16 bars. That’s a great level at which to mix your sound. I usually throw a Vocal Enhancer filter on any clips where someone’s speaking. Then I go clip by clip through the audio and adjust the decibel level of each one, making sure that room tones aren’t too high and buzzy, while making sure vocal levels aren’t too low. Importantly, I make sure that my volume levels are consistent through my entire project.
When I’m done, I’ll spot-check my work by comparing the volume of some of the clips at the beginning with some at the end. If there’s a pop or click between the audio of two adjacent clips, I’ll smooth it out by slapping on a crossfade transition. Sometimes, I trim the time of that crossfade down to a fraction of a second if it reveals itself too much.
Export Settings
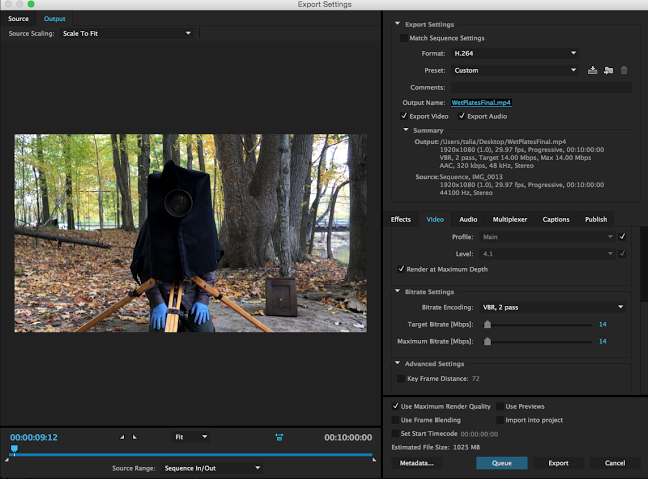
When I export my media, I select H.264 under Format (which, generally speaking, is the best for web video), and under Bitrate Encoding, I select ‘VBR, 2 pass’. I also select Use Maximum Render Quality and, in the video tab, I check the box Render at Maximum Depth. To boot, I also bump up the Target Bitrate and Maximum Bitrate levels by one, or by two if I’m feeling lucky.
And that’s about it. Of course, you can dig way deeper into color correction, into sound, into a lot of things I touched on here – as I said, this is a best-fit line of a post workflow. And, I’ve got plenty of ideas for ways to improve my current rig – for instance, there’s a 2:35:1 adapter from MoonDogLabs that I’d love to explore. But, what we’ve got here today, really, is a damn fine guerilla handbook for quickly and easily producing high-quality content – with a smartphone, no less!


