Need to make a video, but don’t have a camera? No problem!
There are plenty of imaginative ways to create video with just a laptop. We’ll walk you through ten of the most accessible and straightforward ways you can make video without any fancy gear at all. Warning: once you read this post, you’re out of excuses for not making more video!
1. Artificial Intelligence
No, really. There are online services that allow you to create videos using AI to handle the editing process.
First, you’ll need to pick a topic by entering text or a URL. Then, the platform you’re working with will put together a video using sophisticated algorithms, licensed content, and automated editing tools.
One such platform is Wibbetz, a startup using AI to automate video editing. Another option is GliaStudios, which works in a similar manner.
A related option is Magisto. They allow you to upload your own clips, and uses AI to edit them together according to the mood you select for your video. This is a good option if you’ve already got some content to work with.
None of these options are fully automated – at least, not yet. You still retain plenty of control over the branding and final output of your video.
2. Live Stream
Don’t have time to record and edit a video? Live streaming is a quick and easy way to get a message across to viewers.
As a bonus, a recording of your live stream is automatically saved to your SproutVideo account. You can then share the on-demand video as-is, or download it, make some tweaks, and reupload it to our platform. It’s basically a two-for-one solution to creating a video with just a laptop.
You can live stream using your camera’s built-in webcam, a screencast, or pre-recorded video files. For a more thorough guide on how to live stream, check out our recent How To Video episode on the six simple steps to live streaming for business.
3. Screencast
Screencasts allow you to capture activity on your screen as you navigate different programs or webpages. Often used for support videos, screencasts are a great way to walk viewers through a specific process, or teach a new skill.
Here’s our guide to making a professional screencast, with detailed steps to follow:
First, you’ll need a screen capture program, like Quicktime, SnagIt, Screenflow, or Movavi. There are many, many other options, from free to paid. Try out a few, and pick the one that best suits your workflow.
Key features to look for include HD video support, easy navigation, audio capture, and special effects, like the ability to highlight a specific part of the screen.
Then, pick a topic. It could be showing viewers how to use a new tool, or to complete a process correctly.
Practice the steps you’ll be navigating ahead of time. It will help ensure a smooth video, with fewer mistakes.
Although you can record the screencast and audio at the same time, that might not be ideal. If you miss a line, or stumble for a word, you don’t want to have to redo the whole sequence. For this type of video, recording the audio separately could save you a lot of headaches, even if you have to edit the audio and video together afterwards.
However you choose to record the audio, quality does matter. You don’t need a fancy microphone to sound great. The most important factor might be a really quiet room in which you can record your script.
You can make do with the built-in microphone for your laptop, use your phone, or spring for an accessory. For instance, this microphone does a great job for voiceovers. Whichever microphone you choose, jot down the bullet points you’ll need to hit, and start recording!
4. Webcam Talking Head
Technically, this requires your laptop to have a built-in camera. Most do these days, so we’re counting it!
The key to making a talking head video that looks professional is to get the lighting right, position the laptop correctly, and frame your shot well. Your traditional desk setup is not likely to be optimal for this type of video.
If your laptop is on your desk, it’s much too low to get a flattering angle when filming your face. You’ll want to raise it up so the camera is roughly at eye level. Then, angle the camera slightly downwards to avoid giving viewers a glimpse up your nose, or the dreaded double chin effect.
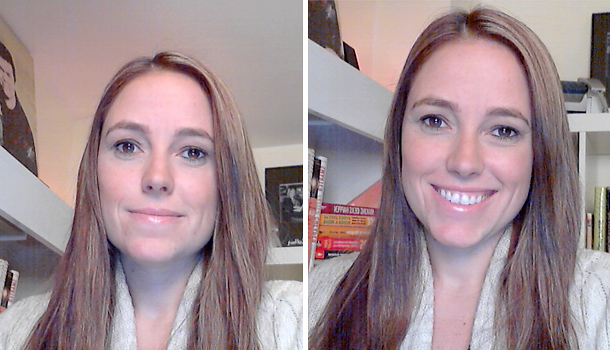
Image Credit: Fast Company
The photo above contrasts two different camera angles. On the left, the model is looking slightly down at the camera, resulting in a less flattering image. On the right, she’s looking slightly up at the camera, which is typically flattering on most people. It’s subtle, but a small change in a camera angle can work wonders on film.
Lighting is equally important. Move any available table or floor lamps behind the laptop, and position them so they softly illuminate your face. Make sure there aren’t any harsh shadows behind you. Also, check to be sure you’re not silhouetted by a backlight, such as a window.
Finally, frame your shot properly to make sure it’s visually interesting. Be sure to take care of the basics, like clearing clutter behind you. Rearrange furniture and art if you have to, in order to create a visually appealing space.
With your laptop positioned correctly, flattering lighting, and a properly framed shot, you’re ready to film! In order to do so, you will need software to enable you to record video from your webcam. If you’re using a Mac, you can use Quicktime, or if you’re on Windows, you can use the Camera app.
5. PowerPoint
Did you know you can export video from PowerPoint? This isn’t really the best way to make video, if we’re being honest. But, it will do in a pinch!
Microsoft provides an extensive guide to using PowerPoint to create video. You’ll need to be familiar with using PowerPoint. Even then, their guide warns that it could be a time-consuming process to undertake.
You’ll probably want to add a voiceover to your video, too. We wrote a guide recently about making professional voiceovers on the cheap. If you’re working with just a laptop, you’ll be limited to your built-in mic. You can still get a good result as long as you can control the amount of background noise in your environment.
6. Animated Video
If you go with an animated video instead of live action, the world is your oyster. Not only can you be extremely creative, you have a plethora of options to choose from, and total control over the end result.
Unless you are a talented artist or design professional, we’d recommend going with an online service that takes the guesswork out of creating animations. Some of our favorite options for animated video include Vyond, Animaker, Raw Shorts, and Powtoon, but there are plenty of other great choices.
Sketch out the different scenes of your video to help visualize how you’d like the end result to be. This can be as rough or as detailed as you’d like. It’s a simple step, but it’ll help you stick to your concept, and achieve a polished result.
This animated explainer video for Padmapper by Grumo Media is from 2011, but it’s still engaging and nicely done:
Keep it short and sweet! Especially if you’re just starting out, it’ll be easier to stay motivated if you don’t try for a feature length film right off the bat.
If you get stuck, there are professional animation studios, like Grumo Media, or our friends Adelie Studios, that can help bring your ideas to life.
7. Stock Imagery
Believe it or not, you don’t even need actual video clips to make a video. You can use still images, and some simple editing techniques, to create a visually interesting video.
This type of video works best for news, current events, or historical videos featuring well-known figures. It can also work for short commercials or clips.
In this case, you’ll want to carefully script your video so you can more easily search for the imagery you’ll need. When reading through your script, think about possible ways you could portray different sections visually. Any specific places or renowned people are key to include.
You can purchase images from popular sources like Getty Images or Dissolve. Or, scour free sites for the images you need. We love Pexels, Unsplash, and Pixabay.
To keep it visually interesting, you’ll want to use a mix of panning, zooming, transitions, and possibly an editing technique known as the Ken Burns effect. Each adds motion in different ways to make it more of a video rather than a slideshow.
8. Stock Video Clips
You really don’t have to film everything yourself. If you’re pinched for time, or only have a laptop, you can find everything you need on the internet.
For example, Dissolve put together a pretty convincing video using only stock footage:
Although it’s meant as a parody, the video effectively proves the point that you can make a polished and attractive video with only stock footage.
Check out this updated article for an extensive guide to using stock footage, and finding it for free (or cheap).
9. Recorded Webinars
Webinars can be a great way to grow thought leadership, answer customer questions, or attract new leads. Once it’s over, don’t just discard the recording. Make it available to other website visitors as a resource, or as marketing for future webinars.
Most webinar platforms, like Webex or GoToMeeting, offer the ability to record and export video out-of-the-box. You don’t really need to do any more than that if you don’t want to.
However, it might be worth cleaning things up a bit. Say there’s a bit of chitchat at the start that doesn’t really add anything to the content of the webinar. You’ll likely want to trim it using a video editing program like iMovie or Movie Maker.
Sometimes, the visuals for the webinar aren’t that great, but the audio content is. In that case, you can go even further to edit your webinar into a more polished video. Swap out the visuals for higher quality screencasts, images, or stock video content.
You’ll need an editing program that can separate audio and video tracks. Both iMovie or Movie Maker offer that, as does Final Cut Pro and Adobe Premiere, among other options.
10. Repurpose Existing Videos
This one might be cheating slightly on the “you only need a laptop” premise. However, unless you’re really just getting started with video, you probably have an existing library of clips or finished videos.
Dive into that library and remix and match to create new videos. It might be as simple as creating a shorter version of a long video to share on your social channels. Or, an updated voiceover for an older video.
…Or, a Combination of the Above
Each of the approaches above could result in a finished video. However, you might need a combination thereof to achieve the result you want.
For instance, you could mix voiceover from a webinar with a screencast of your website. Or, take some old content, and add a new intro using your webcam to frame it differently.
Variety is the spice of life, as they say. There’s no real reason to exclusively use one technique when making a video.
Once you’ve created some quality video content, you’ll want to pair it with the proper video marketing tools. Here at SproutVideo, we provide premium video hosting that comes with a whole host of powerful marketing tools to take your video marketing efforts to the next level. Try us free for 30-days to see for yourself.