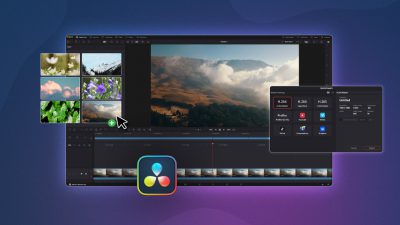
We’ve covered the basics of color grading in Adobe Premiere, and the details of a professional workflow using DaVinci Resolve and Adobe Premiere. In this episode of our How To Video: Post Production series, we’re taking it a step further to show you exactly how to color grade your footage with the same software the pros use.
Color grading isn’t just about making sure the reds, greens, and blues are all in balance. It’s also where you can remove blemishes, or highlight specific aspects of your image to get the exact look you want.
Watch the tutorial below and keep reading for an in-depth guide to color grading using DaVinci Resolve.
Color Grading Tutorial
In this video overview, SproutVideo’s Creative Director, Nick LaClair, walks us through exactly how to color grade footage. You’ll learn how to work with nodes to map your changes to different elements in your clips, apply a grade to multiple clips, and hide or emphasize specific aspects of your visuals.
Getting Started
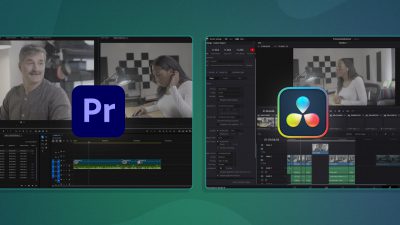
If you’ve followed the steps in our workflow for Adobe Premiere and DaVinci from last episode, you’ll already have your XML file in DaVinci. If you need to, head back to that article for step-by-step instructions on how to get your XML file imported into DaVinci.
Navigating the Workspace Tabs
By default, you’ll land in the Edit tab since we started by opening the XML file imported from Adobe Premiere. However, if you wanted to add footage, create timelines, or edit footage together, you’d want to navigate to the Media tab. Finally, the Fusion tab allows you to add graphics, like titles or text overlays.
Since we already took care of editing in Adobe Premiere, we’re heading straight to the Color workspace.

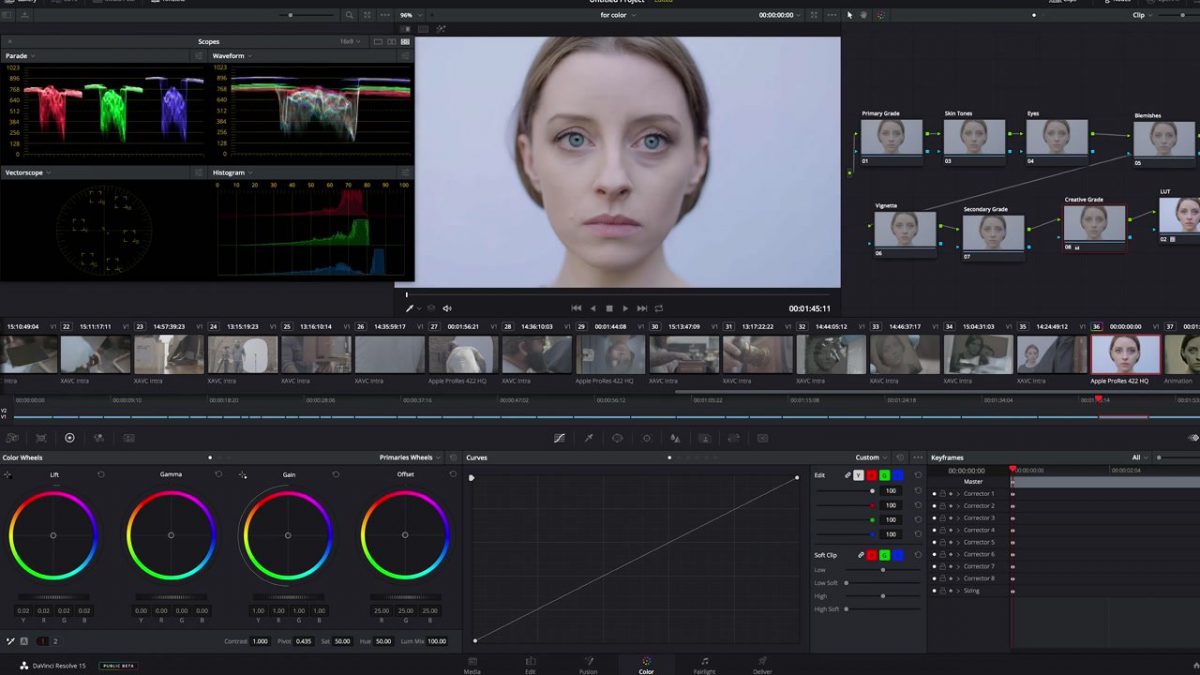
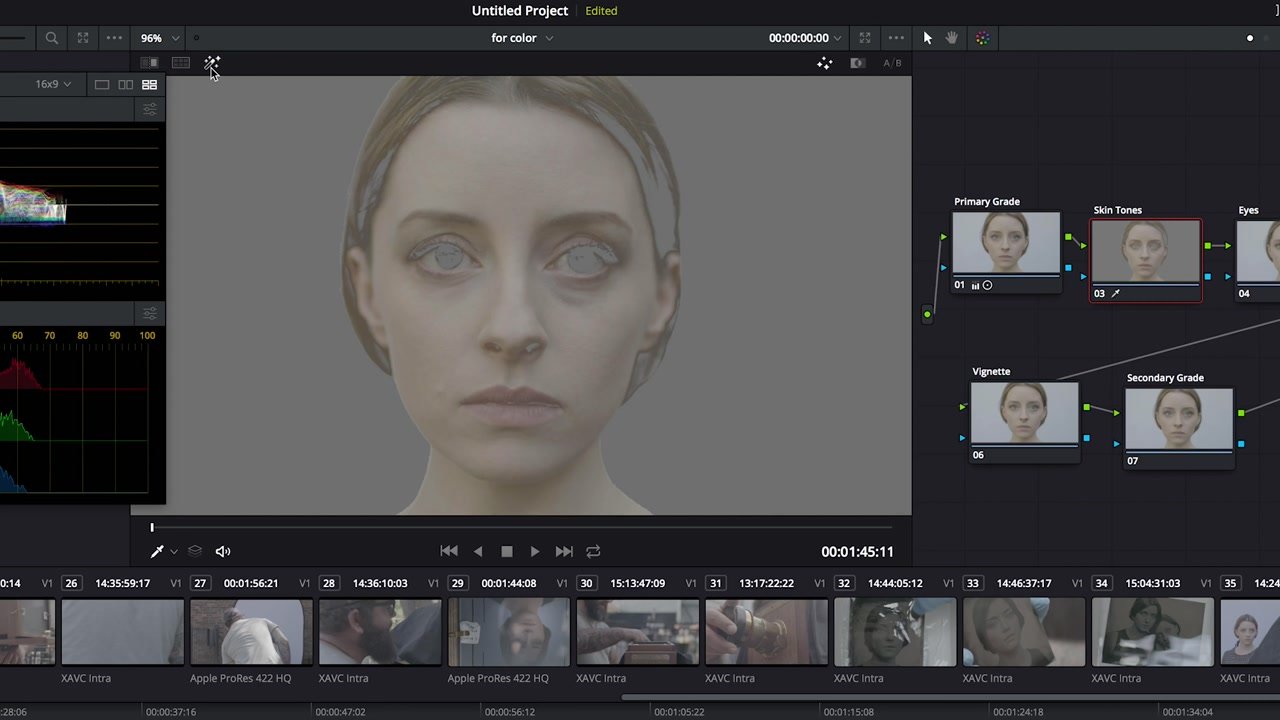
There, you’ll see your timeline, with each clip represented by a thumbnail. Select a clip to color grade, and it will open automatically in a node to the right of your screen.
Working With Nodes
Nodes allow you to map your color grade to your footage, and make precise changes to different elements of your footage. It’s a visual way to configure the changes you are making to each clip.
By arranging your nodes in different ways, you can change how the effects are applied. For instance, you can make the changes sequential by adding nodes in serial, or layer them as needed. You can create as many nodes as you’d like for your project.
How to Use Nodes
In our example, we used serial nodes, meaning that each successive node would apply new changes to the output from the previous node. Processing your image in this manner allows you to build the effect you want piece by piece.
When working with multiple nodes, it’s crucial to stay organized. Label each node you create with an easily recognizable name to avoid confusion over the purpose of each node.
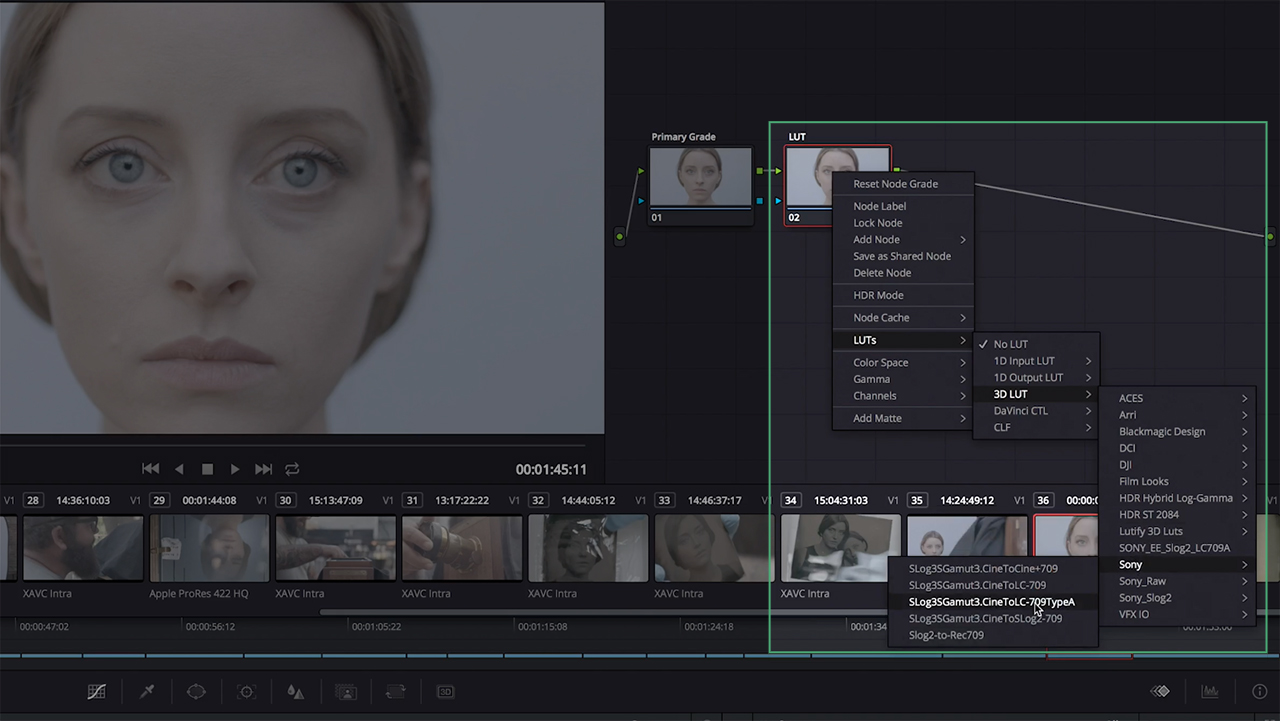
For starters, we renamed our first node as “Primary Grade”, and the second serial node as “LUT”. Most color grading projects will have these two nodes at a minimum. That’s because most footage shot on a professional camera will be recorded in a Log format. A LUT converts flat Log footage into a colorspace for output. Essentially, it’s a shortcut for making colors more lifelike. Meanwhile, your primary grade allows you to make adjustments to the image before the LUT is applied.
The LUT node belongs at the very end of the color grade because LUTs are destructive. Basically, if your LUT creates blown out highlights, you can’t correct it with any further changes after the LUT is applied. So, any input being fed to the LUT node needs to already be edited as you’d like it.
Select the LUT that is suitable for your footage, and drag and drop the LUT node to the side of the workspace to allow for adding additional nodes.
After setting up those two nodes, we’ll add some more specific to the project we’re working on. Your nodes might be different according to the footage you’re working with and the effects you are going for.
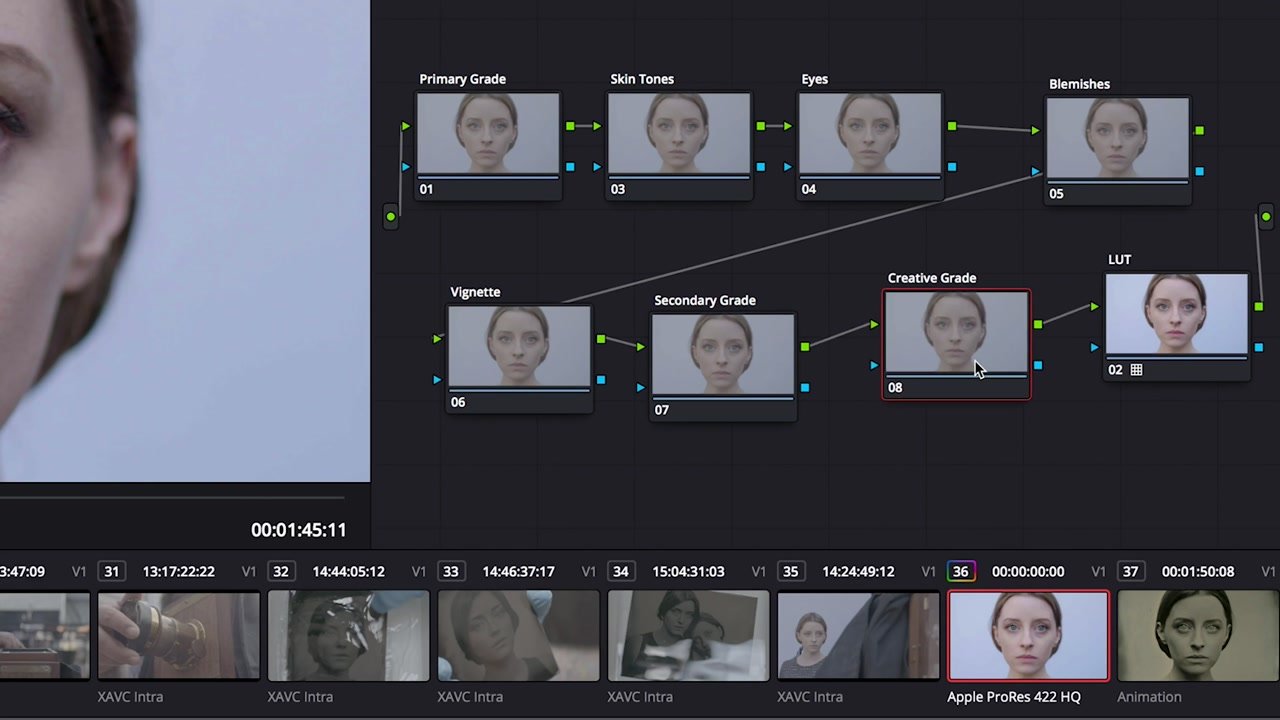
For instance, we added nodes for Skin Tone, Eyes, Blemishes, a Vignette, a Secondary Grade, and a Creative Grade. Each node corresponds to a visual element we want to adjust in our footage. We’ll work through each of those so you can see the difference they make to our final output.
Using the Video Scopes
Now that the nodes are setup, we’re ready to start the color grading process. Navigate to the Workspaces menu to access the video scopes. These colorful graphs will be displayed to the left of your screen.
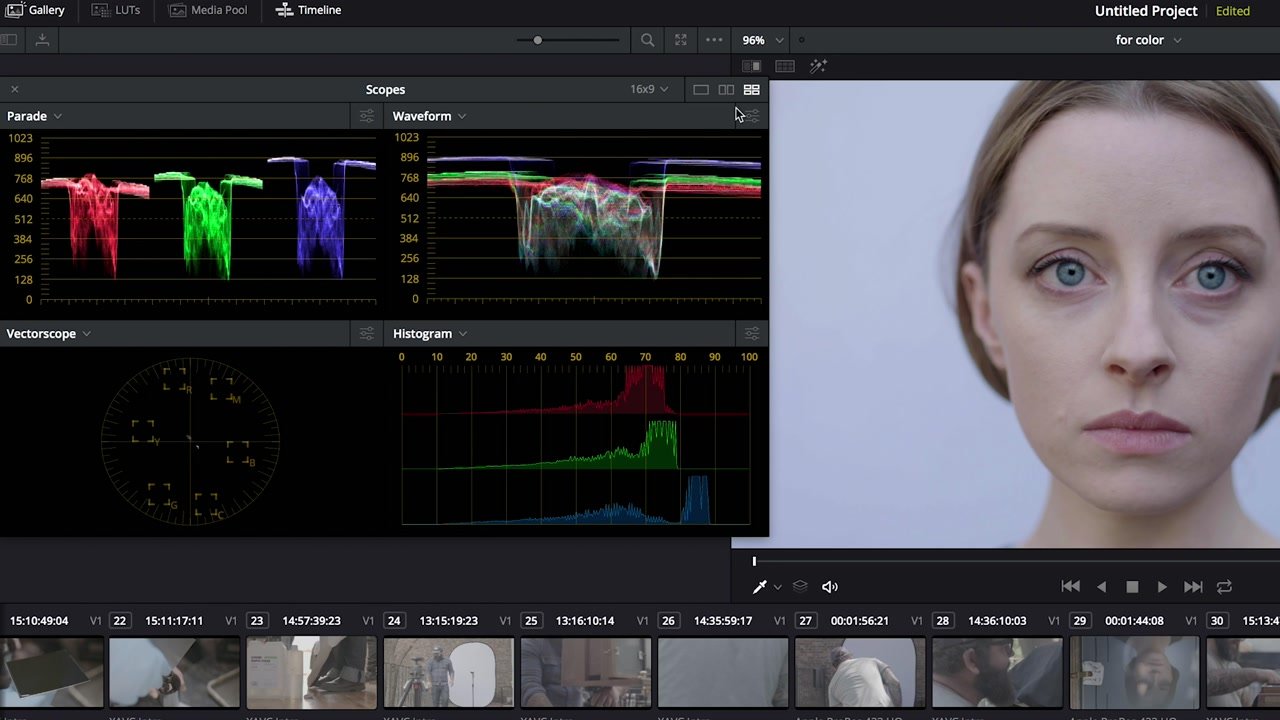
The video scopes tell us crucial information about light and dark areas of our image, as well as the levels of red, green, and blue in our image. They’ll help guide your color corrections throughout the color grading process. For more on how to interpret the information in the different scopes, check out our previous episode on color grading fundamentals.
Color Grading With Wheels
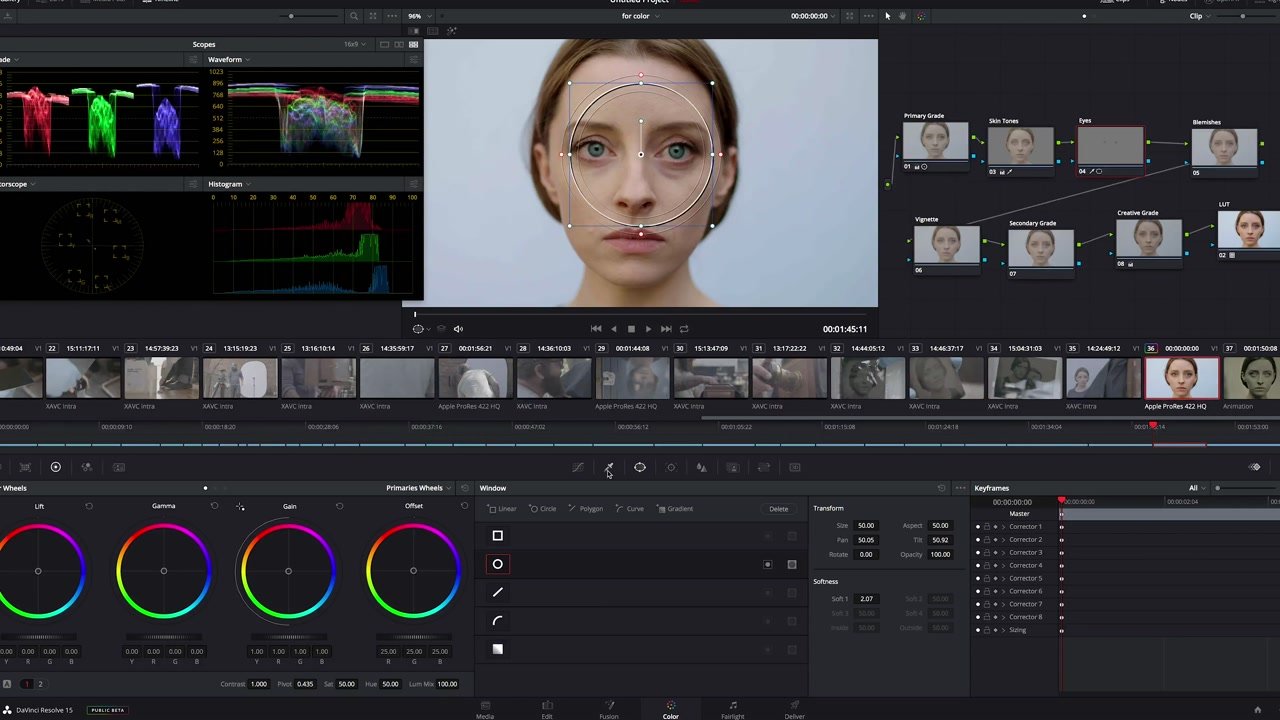
Professional colorists use tools shaped in the form of a wheel to make minute adjustments to visuals. The wheel tools in DaVinci Resolve mimic those tools very closely.
DaVinci gives us lots of choices for color wheels. Each wheel has two elements – the wheel itself for adjusting color, and another tool just below it for changing the luminance.
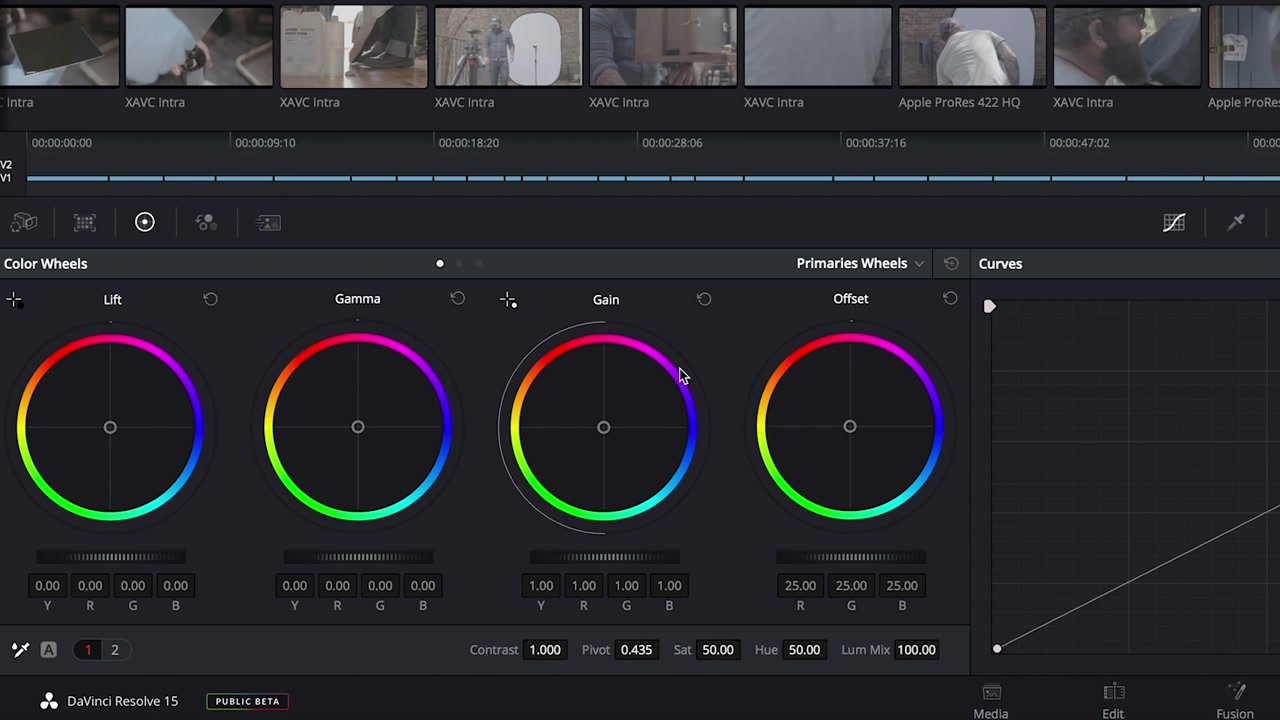
Above, you can see the wheels for lift, gamma, gain and offset. These basically correspond to shadows, mid-tones, and highlights, while offset changes the entire image.
In the Primaries set of wheels pictured above, each wheel affects its allotted area of the image, but it also affects much of the rest of the image as well. Review 1:51 – 2:00 to see how much the image changes as Nick adjusts the different wheels. Keep your eye on the waveform monitors to more easily understand the impact.
DaVinci also offers a set of Log wheels, which provide more minute control over each individual aspect of the image. This set of wheels gives you very finite control over shadows, mid-tones and highlights. Review 2:01 – 2:16 to see how these wheels work differently from the other set.
There’s a right time for each set of wheels, and as you get familiar with how they work, you’ll be really glad you have them both.
Additional Controls
To the right of the wheels, you have additional tools for controlling how the effects are applied to your clip. There, you’ll find:
- Curves – adjust the hue or saturation of part of an image
- Qualifier – mask certain aspects of the image by selecting colors from the image
- Window – draw shape “windows” to create masks, allowing you to select or exclude parts of the image
- Tracker – track windows or masks across movement
- Blur – blend or soften the image, or selected parts of the image
- Key – change the input and output to determine how much of each node’s corrections will be visible in the image
- Sizing – control the rotation, aspect ratio, pan, tilt and more
Adjusting Each Node
Now that we understand the tools at our disposal, we’re ready to start color grading! First, click to select a node to make changes to that specific node.
Primary Grade
In our example, we start with the primary grade. This node is for setting your color temperature and general tones. If your image is too warm or too cool, this is where you should fix it.
Use the wheels to make any necessary changes. For guidance on using the waveform monitor to know when you’ve hit the right white balance, please refer to our episode on color grading fundamentals.
In terms of highlights, as a general rule, you don’t want to go above 896 on the waveform monitor if you can help it. Any higher than that, and you’ll risk blowing out the highlights, and losing lots of detail in the lighter parts of the image.
Skin Tone
Many videos feature people, so addressing skin tones is a common need when color grading. Here’s how to selectively make changes to a person’s skin tone.
First, click on the Skin Tone node to select it. Then, you need to isolate the element you want to edit. In this case, we’ll use the Qualifier tool to create a mask by using the eyedropper to select the color of our subject’s skin.
Toggle your center image to show what you’ve masked. It’s a little creepy-looking, but the greyed-out areas of the image will not be impacted by any changes you make.
To get rid of any hard edges in the mask, and ensure you have good coverage for your changes, adjust the blur radius. For instance, Nick usually takes the blur radius up to around 35. This helps reduce the chances you’ll omit an area of your image that should’ve been included in this node.
Once you have your mask in place, you can adjust your image as needed. In our example, Nick adds some magenta tones to make our subject’s skin color more vivid and lifelike.
Emphasize the Eyes
Think Frodo in Lord of the Rings. Sometimes, eye color just really needs to stand out on screen. This is how you can achieve a similar effect in your own video.
This is nearly the same process as creating a mask for the skin tone adjustments. After clicking the corresponding node, you’ll use the Qualifier tool and the eyedropper again to select the color of your subject’s eyes.
If you find that you have a lot of color appearing in areas of your image you’d like to exclude from your mask, you can use the Window tool to limit where the mask can be applied. In the image below, the window is the circular overlay on our subject’s face. This extra step ensures the changes we make will only apply to the blues located in the window.
Now that you’ve isolated the subject’s eyes, you can make any needed adjustments to the brightness or saturation of their eye color.
Blemishes
Blemishes are a fact of life. However, that doesn’t mean you have to see them in a finished film.
In most cases, the Qualifier tool won’t work because the color of the blemish would be hard to isolate from the rest of the person’s face. Instead, the Window tool is the way to go.
Be sure to select the blemish node, and then go to the Window tool. You can resize, rotate, and change the feather of your window as needed.
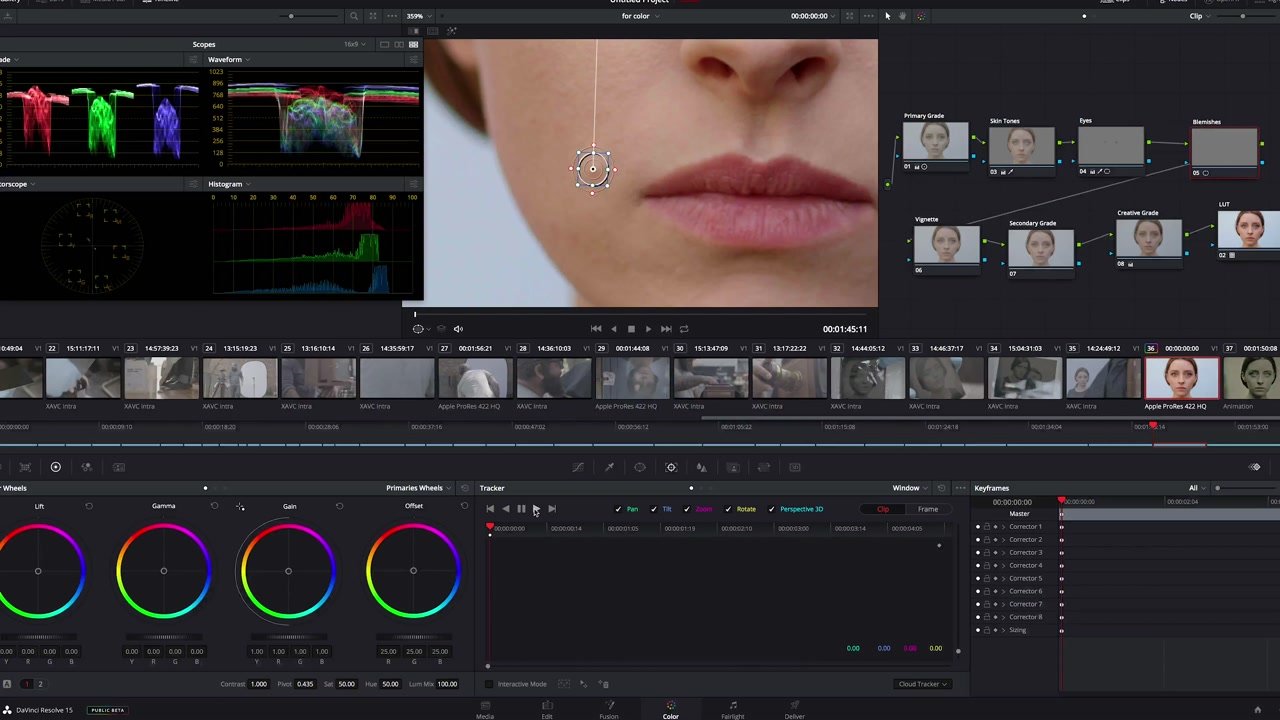
Next, we want to make sure the window we just created won’t stay in one place as our subject moves around on screen. Go to Tracker, and make sure you’re on the first frame of the clip. Then, track it forward so the window will follow your subject’s movement in the frame.
Finally, go to Blur, increase the radius, and it will blur that blemish into oblivion. If only it were that easy in real life… To see a before and after, go to 4:30 – 4:35 in our video.
Vignette
A vignette is a subtle artistic choice that calls attention to the subject in the middle of our frame. It essentially darkens the corners of our image ever so slightly, helping to emphasize the center of the image.
To create a vignette, you’ll also want to use the Window tool, sized to frame your subject.
Using the offset color wheel in the Primaries set, you can bring down the overall tone of the image. You’ll notice the area under the window darkening as you change the offset.
Adjust the offset according to the level of drama you’re going for. Finally, invert the window to highlight the center and darken the edges. Et voilà, a vignette.
Creative Grade
A creative grade allows you to apply a specific look to your footage by using a preset. For instance, if you want to make it seem as though your footage was captured on a specific type of film, you can do that with your creative grade.
In general, this is a fairly advanced option. It’s fun to play with, and you can always try different looks to see what works for your project.
In our example, we applied a Film Look located under the 3D LUT options in the LUT menu. We picked the Rec709 FujiFilm 3513DI D60 option, and then dialed back the intensity by using the Key tool to lower the gain of the output.
Secondary Grade
The secondary grade node is where you should make any fine-tune adjustments after all the other nodes are applied. This is where you want to perfect your image before the LUT is applied.
Typically, this is a necessary step even though you already have a primary grade in place. The reason is that any changes made to your primary grade will impact all of your qualifiers and masks in the other nodes.
For instance, if you set the qualifier for skin tones to a certain type of magenta, and then you change the hue of the image in your primary grade, the skin tone qualifier will be impacted because you edited the input to that node. You’re better off making tweaks in a secondary grade than trying to adjust your primary grade and redoing all your subsequent masks and qualifiers.
Applying the Grade to All Clips
Of course, that process would be unbelievably tedious for anything but the shortest of videos if you had to follow it for every single clip. Luckily, it’s easy to quickly copy a color grade over from one clip to other clips.
First, make a “still” of this clip by right clicking, and selecting “Grab Still” from the menu.

A gallery of all the stills you create will appear behind your scopes to the left of your screen.
Next, select another thumbnail that needs a grade. Then, go back to the still, right click, and select Apply Grade. This will copy the grade from the still to the selected clip.
A handy shortcut for applying a grade requires the ability to middle click on a mouse. In this workflow, you simply select the thumbnails that need a grade, then middle click on a thumbnail to which you’ve already applied the grade you want. This is a little more streamlined than creating stills and navigating menus to apply a grade.
Of course, your mouse might not have a middle button to click. Don’t despair – you still have options. You can map a gesture to any customizable mouse, such as a Magic Mouse, or map the gesture to a button on a tablet with a stylus (Nick uses a Wacom tablet) instead.
Color Corrections
Sometimes, you might have a great-looking color grade for a clip, but find it contains elements other clips do not. In our example, we created a color grade for a shot of our subject’s face, but many of our other clips do not feature people’s faces at all.
In order to prevent any errors as you’re making bulk changes, and to simplify the grade, you can easily remove the nodes you don’t need. For instance, we removed the nodes for the eyes and the skin tone, as well as the vignette and the blemish removal. Then, you can easily apply your cleaned up color grade in bulk to any clips that need it by creating new stills or middle clicking as detailed above.
Compare and Contrast
As you’re finalizing your color grade, you might come across certain clips where your bulk changes don’t quite work out the way you’d like. In many instances, it’s useful to be able to compare and contrast those clips with a clip you want to emulate. This enables you to obtain a more consistent look across your entire video.
To do so, first, create or select a still to use as a reference following the process detailed above. Click on the thumbnail you want to compare to the still, and then click the Split Screen button near the center of your screen. This will place the still (on the left) and the selected clip side-by-side:
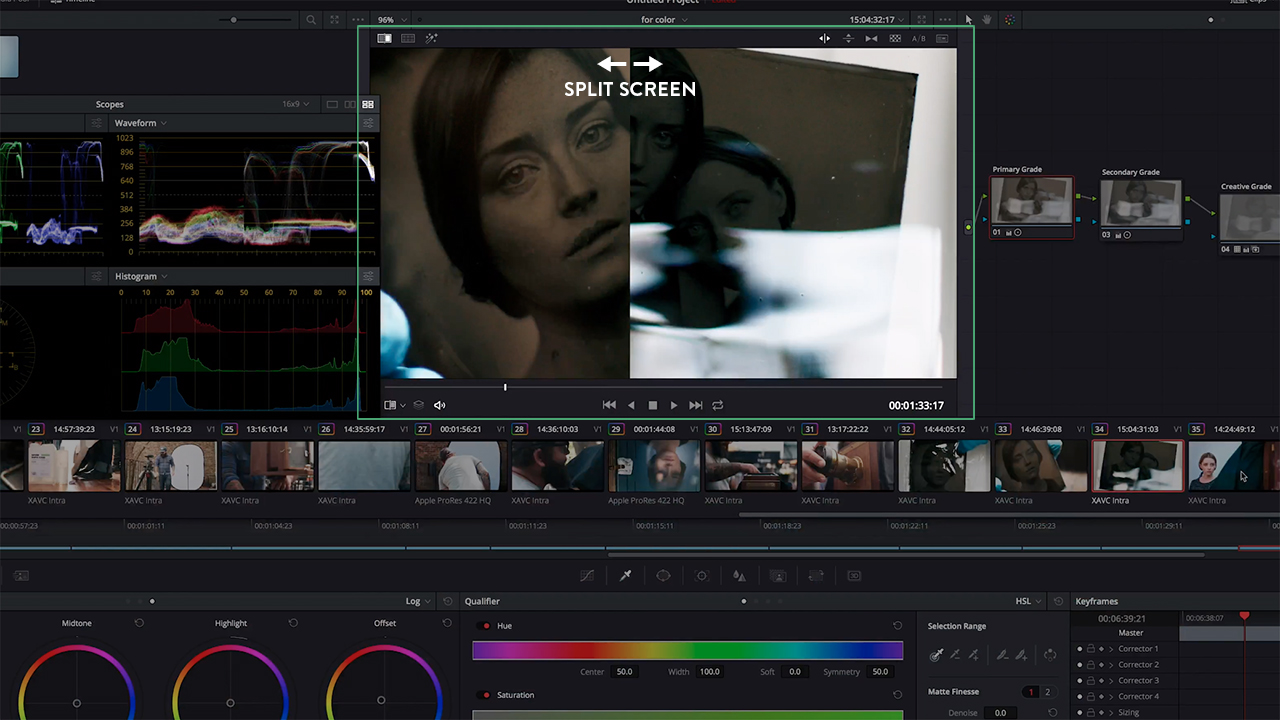
Select the primary node, and use the wheels to adjust the clip until it matches the still you’re using as a reference. This is essentially a trial and error process, so play around with the wheels until it looks right.
Putting It All Together
Once you’re finished grading your footage, you’re ready to export it back to Adobe Premiere. There, you can render a final output for your video, and share it with the world!
For details on how to do that, please refer to our second episode on color grading, which covers how to export and import footage between Adobe Premiere and DaVinci.
If you made it this far, we hope you saved some questions for the comments! Please share them below for expert advice on color grading.
Don’t miss the rest of our How To Video series! Subscribe to our newsletter today and get each new episode in your inbox, plus other video-focused tips and trends.