Delivering a message on camera is one of the most challenging parts of creating professional videos, especially if you’re not used to being the star of the show. In the second part of our How To Video: Filming Solo series on filming all by your lonesome, we’re looking at how best to get your message across.
Whether you read from a script or prefer to ad-lib, our tips will help you do so succinctly and efficiently. We’ll show you how to draft a script and use a teleprompter, or film a stream of consciousness with jump cuts, for a business-worthy video.
Winging It
While this style of videos isn’t normally associated with business video, we wanted to include it as an option. You essentially just set up your camera and start talking.
This style is most suited to informal videos that need a personal touch, as exemplified by well-known YouTubers and vloggers. For instance, Casey Neistat and Peter McKinnon have built large followings on YouTube using this editing technique almost exclusively.
There are a few different approaches you can take with this style, including straight jump cuts, multi-camera jump cuts, or minimal cuts resulting in a very long video.
Jump Cuts
A jump cut is a type of cut in editing that separates two sequential shots of the subject. This type of edit is usually reserved for informal videos on social media because the edits are very obvious, as the video just jumps forward in time.
It’s popular because it’s a fast and efficient way to cut down lots of footage to just the intended message. It’s also convenient for when you’re filming yourself because you can just let your stream of consciousness unfold without interruption.
After recording, you simply go back and cut down your message to a short, concise video using jump cuts. This makes the video extremely fast-paced, which can be good for keeping your audience engaged.
Multi-Camera Jump Cuts
This technique borrows heavily from the standard jump cut, but adds another camera or two. The idea here is to cut back and forth between cameras every time you need to make a cut. This technique will still result in a fast-paced video, but will be a little more polished since the edits can be somewhat concealed by switching the point-of-view between cameras.
Minimal Cuts
This last approach entails using jump cuts very sparingly, if at all. While it’s technically the easiest – you just speak on camera and make minimal edits after filming – it risks resulting in a video that might be rambling, or possibly boring. Very few can pull this off in a captivating way, especially if they are just starting out.
Scripting
One of the best ways to ensure that your message is going to come across well is to script it out fully before you record. This will help clarify your message, ensure you won’t forget anything, and make the editing process much easier.
Script Development
Writing a script can be difficult, but it gets easier with practice. Start by brainstorming, move on to an outline, and then flesh it out with the details you’d like your audience to know. For more guidance on scriptwriting, read our blog post, “8 Script Writing Tips for Online Video.”
Once you have a rough draft, it’s time to start testing your script. The best way is to read it out loud. It’s one thing to write what you’re going to say, it’s another thing to actually say it. By sounding out your script, you can make sure the words sound good on camera and work well with your particular style of speaking. Make edits to your script as necessary.
Draft Assembly
At this point, you should grab your phone or power up your webcam and make a practice film of yourself delivering the draft script. Be sure to only use your webcam for the draft assembly. For your final video, use a higher quality camera if available.
Next, import that footage into your editing program of choice and create a very quick rough draft video. This will undoubtedly reveal more changes you need to make in your script.
Once all changes are made, and you’ve locked in your script, record yourself once again delivering the finalized script. Now, import that version into your editing program, and use it to cut together an assembly of your video. Add placeholders for b-roll sections so you can easily 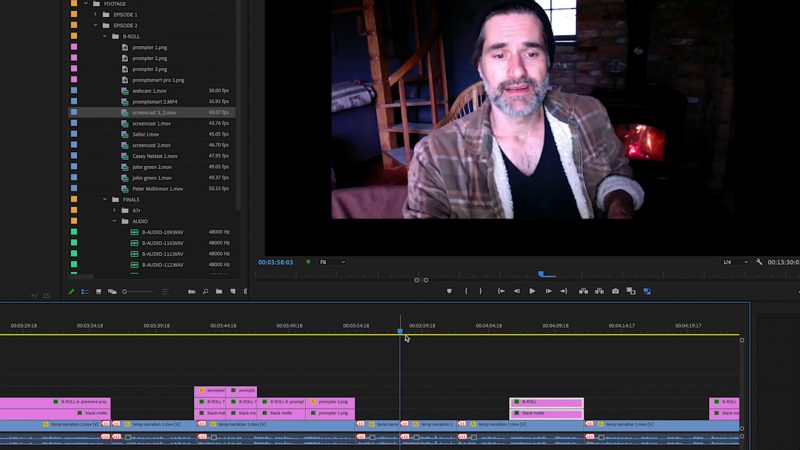
Next, go back to your finalized script, and label the sections that will be covered with b-roll and which will be on-camera. Having this mapped out ahead of time will make recording your final video much easier.
You’ll be able to distinguish between the on-camera sections, where you really need to nail the lines and look professional while doing so, and the b-roll sections, where you can simply record while reading directly from the script. Now that your editing assembly and script are finalized, you can finally move on to recording the final video.
Delivery
Generally speaking, there are two ways to deliver your message on camera: memorization, or using a teleprompter. Both have benefits, but ultimately it will depend on what is most comfortable for you.
Some people can memorize long paragraphs and deliver a captivating message, while others thrive at reading out loud. So how do you decide which tactic is right for you?
Start by recording yourself reading your script as convincingly as possible. Then review the footage to see how you sound when reading out loud. If you sound more like a robot, give memorization a shot. It might come across as more natural.
On the other hand, if you struggle with memorization, sticking to a script and teleprompter might be the way to go. Here are tips for both approaches.
Memorization
Memorizing lines is a skill that comes naturally to some, and requires more work for others. If you can get the hang of it, it’ll make on-camera appearances a lot less painful.
The idea is simple. You’ll need to memorize each section of your script verbatim, or enough of your script to improvise a little while staying on message. If you choose to memorize, you’ll have to make sure your script is broken into manageable sections, possibly broken up by b-roll, so it’s easier to get through it without making a mistake.
The longer the on-camera segments, the more difficult it will be to deliver. Keep this in mind when writing your script if you plan on using memorization.
Teleprompter
At SproutVideo, we typically use a teleprompter. A teleprompter is a device you can place in front of your camera that displays your script while you’re recording a video.
When it comes to teleprompters, there are many different hardware and software options to choose from. We use the One Take Only Pad Prompter.
If your camera has rods, like ours does, you can attach the teleprompter right to the camera. If not, there are options that either clip to the lens or have small tripods of their own. On the software side of things, we use the PromptSmart Pro App on an iPad or smartphone.
Minimizing Eye Movements
While many people use teleprompters, most don’t want it to be obvious that they’re reading a script while on camera. Here are a few tips to help hide it from viewers’ eyes.
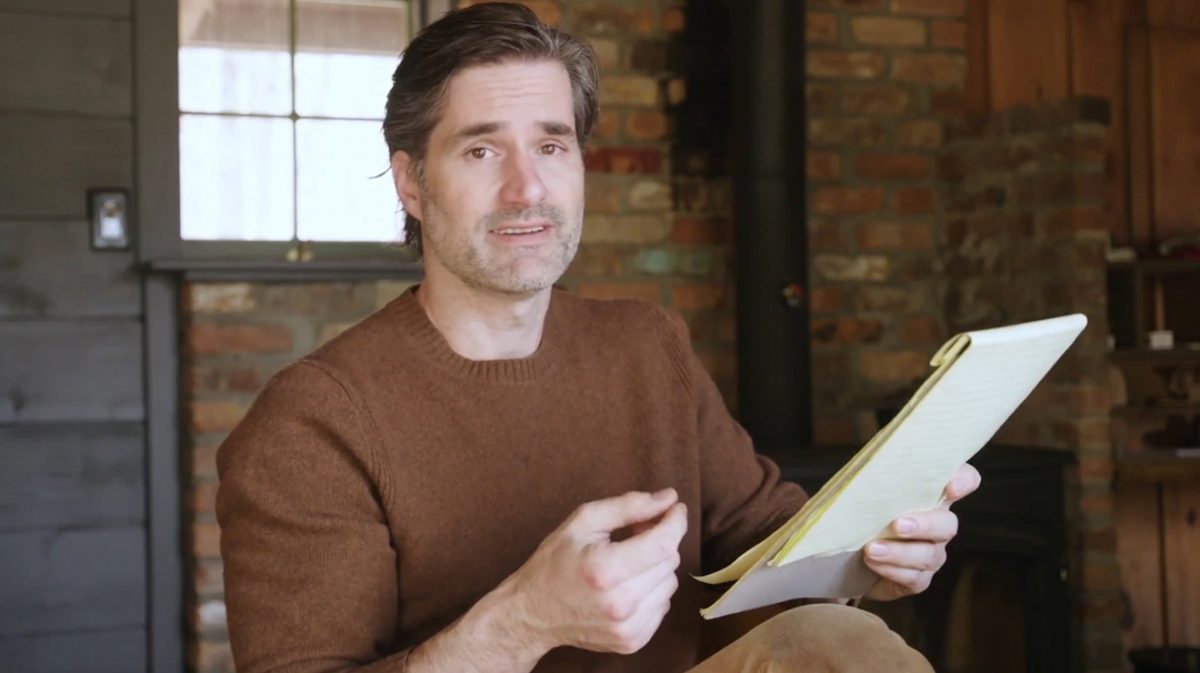
First, make sure you don’t sit too close to the camera and the prompter. The closer you are to the camera, the more conspicuous your eye and head movements will be while reading, as seen in the example below.
Next, make sure the text you’re reading isn’t too spread out. Similar to recording too close to the camera, if your eyes have to move all the way across a wide screen to read, your eye movements will be more exaggerated.
If you’re using your phone as a teleprompter, horizontal or portrait mode should be an OK width to minimize eye movement. If you’re using something bigger like an iPad, be sure to adjust the margins in the app to keep your eye movement as subtle as possible when reading.
Finally, you’ll want to adjust the speed of the text on the prompter. This will likely be a trial and error situation.
Choose a starting speed, and attempt to read a paragraph or two out loud. Adjust faster or slower as needed until you feel comfortable. Some software has voice recognition to scroll as you speak, however, in our experience it doesn’t work well enough to recommend.
More Helpful Tips
Due to COVID-19 restrictions, many of us will have to learn new skills while adjusting to working remotely at home. Over the years, we’ve created many resources to help make your job easier.
For getting comfortable in front of the camera check out our posts` “27 Ways to Feel Like a Natural in Front of the Camera” and “Afraid of the Camera? Face Your Fears With These 13 Tips.”
Watch our How To Video episode for finding music if you’re struggling to lock down that perfect track.
If your video team has become a remote operation due to COVID-19 restrictions, explore our guide for collaborating effectively with a remote video team.
For more tips, browse through our Video Library on our blog.
The process of delivering a message on video will be time-consuming at first, but, when you get more comfortable with your process, you’ll speed up and improve.
Questions about delivering your message on video? Get expert advice in the comments below.