In this post, we explore actionable tips and tricks for easy ways to save time and money on video production. Believe it or not, there are ways you can work more efficiently and produce more content for less. As they say, time is money, so read on for eight of the best tips for producing videos efficiently.
1. How to Set A Budget – and Stick to It
When carving out a chunk of your marketing budget, or simply trying to get a ballpark figure, think of what you are trying to achieve with video. Different types of productions require different budgets and investments.
One-Off Projects
An ‘About Us’ video, explainer video, or recruiting video is likely a one-off production. There’s no need to create multiple videos for these purposes, and one video is likely to last for a while. Typically, these types of videos are worth investing in higher production value compared to others.
Ongoing Productions
Product videos (especially for retail), vlogs, internal communications, and marketing videos are examples of videos that are usually produced on a regular basis. In this case, you’re more likely to focus on ways to streamline production than the individual production quality of each video.
Resources
Once you have a clear picture in mind of the goal for your project, consider your existing resources.
- Should you hire a video production studio, or tackle it yourself?
- Do you need to hire talent, like a spokesperson or a model?
- Do you have any friends or someone inside your company willing to help?
- What about equipment – do you already own it, or do you need to make a purchase, or rent it?
- Do you have an existing space where you can film, or do you need to procure a location?
Outline your needs for every aspect of your production, including the camera, audio, lighting, editing software, talent, location, transportation, film crew, props, make-up, and any permits you may need. Be exhaustive – you do not want surprise expenses if you can avoid them.
Next, research and obtain quotes from any third party providers you may need. There will likely be a range of prices quoted for any single item on the list, allowing you to allocate budget according to the importance of the item.
Be prepared to compromise, but going through the budget process diligently can pay dividends in the future. If you need a deeper dive, here is an in-depth guide to budgeting for your video production.
2. Plan Your Shots in a Logical Order
You can gain a lot of efficiency if you plan your shots carefully. If there are several scenes taking place in the same location, save travel and set up time by taking care of all of them in one day, if possible.
It could also be that your location might not change, but certain shots entail specific lighting, costumes, or make-up. You will save time between shots if you move through the scenes based on the look or lighting required in the shot. It will also be better for the editing process afterwards, because your footage will be more consistent from scene to scene.
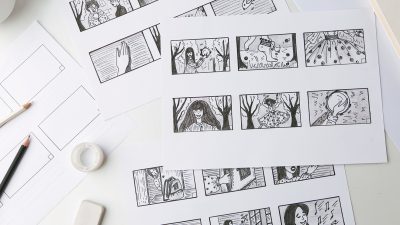
You can even go so far as creating a “shot list.” A shot list is a chronological and detailed list of all the shots you will be doing on a given day or at a specific location. A similar way of planning your shots is storyboarding, which we covered in detail in another blog post.
3. Choose Your Location Wisely
You don’t necessarily need a studio, rented space, or expensive permit. There are plenty of free options available that you can make use of for your video.
Public parks, libraries (you will likely need to ask permission), or your neighborhood can make an interesting backdrop for your shots. If you know someone with a really nice office, or an immaculate home, that might be just the place to film your interview or company intro video.
Try to avoid filming in multiple locations as much as possible. This will save a lot of time by limiting the amount of shuttling back and forth, as well as equipment packing, set up, and breakdown. It will also cut down on costs if you have to pay to use the space.
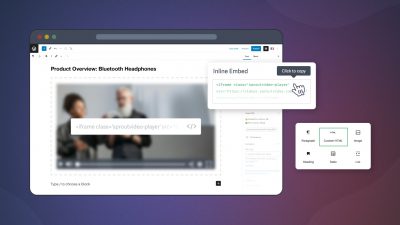
4. Use Stock Images or Video if Necessary
If you are trying to illustrate a point about a specific location, person, or event, you don’t necessarily have to film it yourself. Stock video and image websites can save tremendous amounts of time and money by enabling you to feature subjects in your video without actually filming them.
Look for high-quality options that match your existing footage so it blends more seamlessly.
5. Rent, Borrow, Or Buy
There is a strong case for renting video equipment if you only want to do a one-off video. Technology changes rapidly, so buying an expensive camera can be a real commitment, as well as a technically difficult buying decision to make.
Renting is easy, and most rental camera kits come with all the extras you could possibly need. Sometimes deals are offered for renting more than one item from the same place.
Borrowing equipment from a friend is another great way to fill holes in your existing kit. Both borrowing and renting can be good ways to try before you buy.
If you are planning to make a purchase, obtain the highest quality gear possible for your budget. Some well-known audio/visual stores like B&H Photo, and possibly local stores in your area, have secondhand departments. You can save a lot of money on lightly used or refurbished equipment.
If you are ok with secondhand, garage sales, eBay, and Craigslist can be great resources too. Exercise caution and if possible, test any secondhand gear thoroughly before exchanging any money for it. If a deal seems too good to be true, you can always walk away.
For bigger ticket items, retailers like eBay or Best Buy that offer purchase guarantees or have a return policy are a much smarter choice, especially for secondhand. When buying brand new equipment, shop around, look for sales, or try to negotiate for discounts if buying a lot of items from the same location.
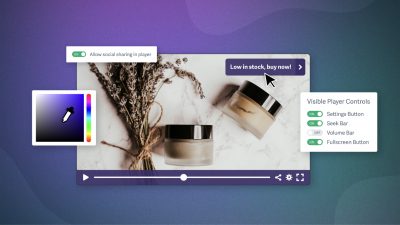
6. Music for the Video
Licensing music can be very expensive. Luckily, there are cheaper options out there like Epidemic Sound or Triple Scoop Music. You can also try to DIY with a program like Garageband, or just do a general Google search for DRM-free music on the internet.
If you are unsure if it is safe to use, you can refer to our handy blog post on the legalities of using music in your videos.
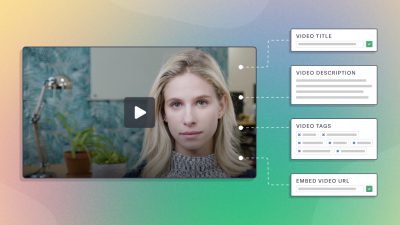
7. Make Sure You Get the Shot
This is on our list because going back for a redo can be extremely costly in terms of time and money. It might not even be possible depending on how or what you were filming. Going back for more can also cause your video to look inconsistent.
There are a few tricks to making sure you have all the footage you need before you actually sit down to edit it. If possible, film from several different vantage points, either simultaneously, or in separate shots. You can use the different angles in the editing process to smooth over any clips you took out, or to just give more visual variety to the shot.
Also, don’t start the action immediately after pressing record, or stop filming right at the end of the scene. You might need the extra time at either end, known as “handles,” for a transition in your video.
Another trick is to film plenty of b-roll on the day of the shoot. B-roll helps to develop context, and can fill in some gaps when needed. Here is a blog post with more ideas on where to get some great b-roll footage.
8. Streamline the Editing Process
When filming, think ahead. Take tons of notes about the action in each shot, or tie the different shots to sections of your script with the video timestamps. This can save you replaying the whole video to find that one specific clip during the editing process. As an alternative, review your shots frequently to memorize where the key scenes are, and to ensure you have what you need for the final product.
An even bigger time-saver is to capture your video directly into your editing software. This is not that tricky to set up. Live capture works best with a stationary camera, such as when you are using a tripod. This way you will not need to import your video to edit it, which usually takes as long as the footage is, if not longer. DSLR cameras or any video camera recording to a memory card can also be a great workaround if live capture is not possible. They usually record to easily editable formats, and are therefore roughly as efficient as live capture.
As usual, cover the basics. Make sure your editing folders (or bins), including all footage, images, music, or graphics are highly organized and clearly labeled. Searching for clips, especially if you are reusing something weeks or months down the road can be really frustrating.
Give us your tips! If you have a genius idea to make the video production process even more efficient, please tell us about it in the comments below!