Whether you’re starting from scratch, or ready to make some upgrades, your home studio is an important investment in this day and age. But, there are endless options for lights, microphones, and cameras, and it’s hard to know if they’re really worth the money.
In this How To Video episode, we’ll be breaking down different types of gear you can use to get the job done. We’ll show you the difference some easy and inexpensive changes can make, and contrast it with gear that could cost over $10,000. So, is it worth the investment? Let’s find out.
In the video below, Nick LaClair, Creative Director at Sproutvideo, will show you the main categories of gear to worry about, and how you can accomplish the best videos at various price points.
Essential Home Studio Gear
When it comes to producing a great video, a lot goes into it, but without good sound, picture, and lighting, your production will suffer. These may seem like basic points, but without them, your viewers may not stick around to see your full video.
In each of these three categories, depending on your budget, what you use can make a really big difference in perceived quality. The low and high end will be very noticeable, but the middle can be a bit harder to distinguish. This works in your favor if you can’t afford the top of the line equipment.
Audio
Sound quality is going to be one of the most important aspects of your video. After all, if your video looks good, but sounds terrible, it won’t get your message across.
Utilize Your Existing Tech
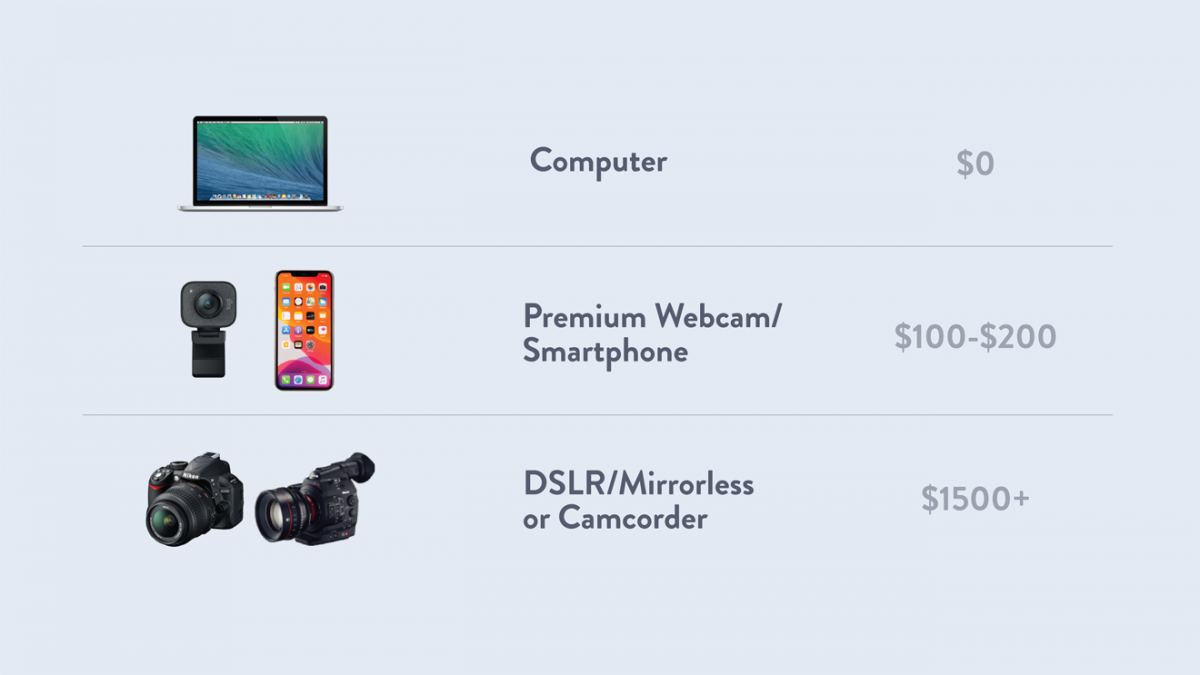
Assuming you have a computer, the lowest and most basic tier for audio would be just using the built-in microphone. If you’re recording with your built-in webcam, this is a great way to get started without any additional costs.
Mid-Range Mic Options
The next tier would be purchasing a mic to add to your setup, which may range in price from $100 to $300 or more. A wired lavalier (lav) is usually the cheapest option. Since you have to plug it in, then clip it to your shirt, it will be visible in your shot. Since they are popularly used on live TV, that might not be a dealbreaker for you, but it may not be your desired look.
An affordable camera-mounted shotgun mic would be the next level up. If you’re using a camera, this type of mic plugs into the audio jack, sits on top of the camera, and points at the subject. In a typical home studio, the mic would still be far from you when you’re filming, but thanks to the pickup pattern of a shotgun microphone, you will hear far less background noise than with your laptop’s built-in microphone.
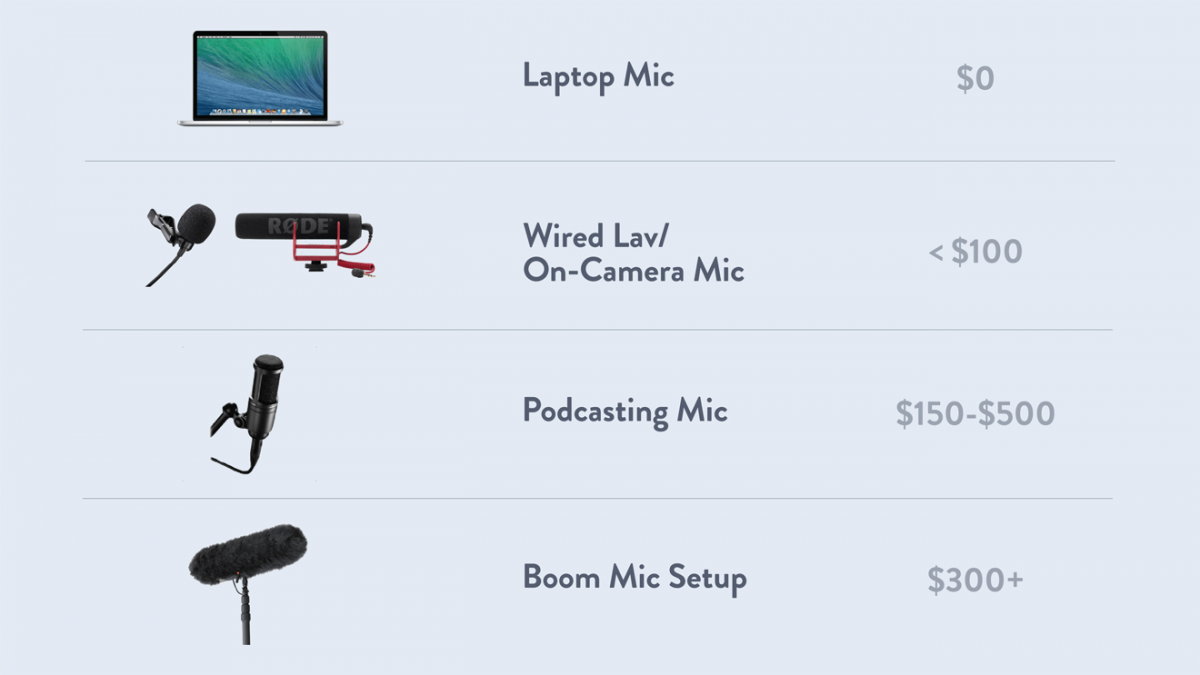
In the $150-$300 range, a podcasting condenser microphone is a bit more expensive but will produce really great sound. However, similar to a lav, you’ll see the mic in the shot. Since this is a full-size microphone, it’s very noticeable, especially since it needs to be right in front of you.
For more on audio, be sure to watch our full run of audio-specific How To Video episodes.
Employ a Full Boom Setup
Last, but certainly not least, is upgrading to a boom mic setup. This would include a boom pole to hold the mic, a high-quality directional shotgun microphone, and potentially a phantom power adapter to power the microphone. This setup will allow you to capture the best audio while keeping the equipment out of your shot. However, this will be the most expensive option in the $300+ range.
Video
When it comes to video quality, you may have more options readily at your disposal in contrast to audio.
Webcam Recording
As mentioned before, using your built-in webcam on your computer is a no-cost option, assuming you have a computer or laptop at home. Yet, just like the built-in microphone, this is going to be the most basic option, and the results won’t be all that amazing.
The built-in webcam has a really tiny sensor, so it won’t capture high-resolution footage. Also, it will shoot a really wide shot, which might not be desirable since you have to worry about what’s in the frame. If you have a perfectly appointed and organized home studio, that might not be a big concern, but for the rest of us, less is sometimes more.
To get the most out of your webcam, place your laptop on a stand or some books so that the webcam is more or less in line with your eyes. If your laptop is usually on your desk, this will result in a more flattering angle.
Use Your Smartphone
Another item you most likely already own that can be used to capture video is your smartphone. The newest smartphones capture high-quality video with the front camera, and even better video with the back cameras. Even if your phone is a couple of years old, there’s a good chance it may outperform your built-in webcam. The best part is this won’t cost you any additional outlay either. If you go this route, an inexpensive smartphone tripod, usually $20 – $50, is well worth the money.
Purchasing a dedicated premium webcam is another good option, ranging from $100-$200. You’ll be able to plug this right into your computer, which adds a convenience factor. Without having to buy anything else, you’ll also be able to easily use it for live streaming or all those endless video conferences.
Opt for a Professional Camera
Lastly, while upgrading to a DSLR, mirrorless camera, or camcorder will set you back $1,500 or more, you can guarantee your image will be top-notch. Here at SproutVideo, we use Sony cameras, but there is an enormous number of options available. To learn more about what to look for when choosing a camera, explore our full post on choosing the right camera.
If you want to use your external camera or camcorder for video conferencing or live streaming, you’ll have to purchase a capture device, and in the case of live streaming, encoding software. We just launched live streaming last year, and made an entire guide you can use to get on your feet. Take a look at our Six Simple Steps to Live Streaming for Business to get started.
Lighting
Last but not least, the all-important element of lighting. Most likely you’ll only need one light source for the videos you’re producing at home. If you can swing it, the free option is to use the ultimate light source: the sun. If you can set up your home studio such that you can face a large window with even light, you’ll be all set. The downside is that sunlight isn’t always reliable, and of course, you’re also restricted to filming during certain daylight hours.
Upgrade to a Ring Light
One of the best alternatives to going all-natural is to invest in an entry-level ring light. We use one that is about $150 dollars, including a stand, and also features adjustable color temperatures so you can change the look if needed.

The next step up from this would be a three-point studio lighting setup, with a key light, a fill light, and a backlight. This may be a bit overkill for your at-home studio, but if you have the room for it, you can produce that perfect glow-y lighting that the pros deliver. To learn how to pull that off, head to our video on the Best Practices for Studio Lighting.
As you can see, some small changes can make a big difference for your footage. No matter where you’re starting from, there’s probably a change or two that will be worth your while.
Still, the underlying lesson here is that you shouldn’t let your gear, or lack thereof, hold you back. If you have a good message and get the most out of your gear, you can produce great work with whatever you have.
Let us know in the comments below what you’re using in your at-home studio.